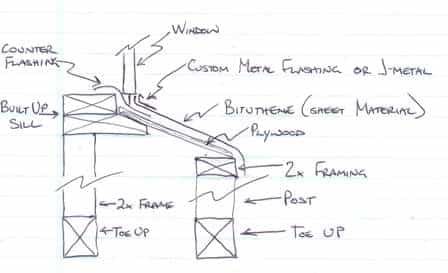
Lots of people want the look of adobe homes when they build with bales. The biggest risk to that is in the inset window details. If this detail is not properly constructed, there’s a good chance, not just a small chance, but a good chance, that you’ll end up with water damage beneath your windows. I’ve posted a sketch of flashing and detailing for inset windows in a straw bale house here that should help ensure water tight seals around your windows.
The detail is for a house that has plaster finished tight to the windows. If you wanted to add a sill of some other material, that is absolutely an option. The key is to use supported bituthene under the windows and over the bales. This way, it’s not going to get poked by the straw over time and end up with holes in it. The outer framing and inner framing help keep the entire unit in place and solid, again, protecting the longevity of the flashing. Be sure to counter flash (adhesive flashing installed on the jambs and sill, before the window is installed. Use the absolute minimum number of nails or screws to fasten the bottom of the window. Some windows don’t allow you to nail the bottom flange at all, so read the manufacturer’s recommendations.
Once the window is installed, lay a large sheet of adhesive flashing (bituthene) over the window flange and out over the edge of the plywood base. Turn the edge of it down over the outer frame so that any water will drain directly to the plaster, not into the bales. Install the side adhesive flashing and then the window head flashing in that order. I prefer adhesive flashing all the way around. Finally, install a J-metal or custom metal flashing under (and around) the window to create a clean stop for the plaster. Use the bare minimum fasteners for this flashing.
If possible, only nail it in two places, outside the window frame by extending the legs of the J-metal wider than the window but while keeping the J channel in line with the rest of the flashing around the window. In other words, the j channel should miter in the corners with the vertical pieces yet the nail plate of the bottom piece can extend out beyond the window frame. Sorry, that’s hard to describe and much easier to show in person at a workshop!
Although the image shows the J-metal out in front of the window flange and frame, it will actually be installed under the window so that water cannot drip in behind it. I had to “explode out” the view so it would make more sense. You can place a bead of clear caulk in the joint between the window and the flashing for extra insurance. Hope that all makes sense. As I said, it’s easier to show you in person than on a blog.


8 Responses
It would make a better seal to put the Bituthene down first and the counterflashing over it.
Not necessarily Tim. Keep in mind that the counterflashing is in place before the window. The bituthene is in place as an “overflash” so that any moisture that comes down the window frame will run away from teh building. It actually creates a tighter seal to have it over the top of the counterflashing assembly.
Andrew,
Why not extend the counter flashing all the way down the sill to get an extra layer of protection? Also, I assume that the same detailing is used for the vertical reveals. Finally, would you bed the lower edge and sides of the window frame in mastic?
You can do the same detailing all the way around, yes; however, it’s not as vital as on the sill where the water wants to find a way into the building through the path of least resistance. You could extend the counter flashing down; however, in the field, you’ll see that it’s actually hard to do because of the turns in the framing. Small corner patches should go on first, then the counter flashing, turned up at the edges and then the window, etc… I did not draw that as it’s hard to represent but it is the standard counter flash assembly.
I don’t use mastic or caulking as many window companies will void their warranty if you use either of those materials to bed the frames. Check with the manufacturer before you do that.
Thanks for the continued up dates. They are giving me good information. If there is a close workshop around San Antonio let me and my son know. Hope to be building before end of year or when it is dry. Is it better to be cold and dry or warm and dry?
Hi Doris. I have a workshop scheduled for June in Hico, Texas. That’s as close as I am getting to San Antonio as far as I know. Hope to see you both there.
Andrew
Is there a way to add wood trim to plastered walls on the outside? I like the look of Craftsman homes and hope to use timberframe and would like to see that on the inside of the house. I just don’t like the look of those flat unadorned windows – has that unfinished look to my eye. Would one need to put some kind of nailers inbeded in the bales to accomodate traditional window frames?
Hi Sarah. You can indeed trim windows with traditional style wood trim. I suggest adding another nailer next to the king studs and making the sill a bit bulkier as well to accommodate the trim and the J-Channel/mesh attachment.