 Here’s a question I had about using American Clay over a brown coat of Natural Hydraulic Lime Plaster (NHL):
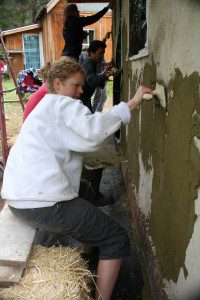
The plasterers did not get two interior walls brown coated this last time and we were wondering about the curing time of the NHL and the American Clay finish coat. Have you ever done a clay (or other material) as a finish coat over the NHL? Would 7 days be long enough to let the brown coat cure before putting on the final coat?
I was just wondering with the good breathability of the American Clay if it would be ok to do that. I don’t want to rush and be stupid about it. Just thinking of different possibilities.
Here’s my answer:
You can do the finish coat over the NHL as long as the coat has had adequate time to dry and shift. If, however, the coat is still not done curing, you run the risk of getting cracks in your finish coat. American Clay is a very thin coat, so those cracks would be difficult to cover up. That said, it is best to put on a couple coats of clay before the American clay finish to get the look they show in the books.
Those coats might be enough to provide some flexibility for the wall and may cover any minor cracks. That said, the brown coat should not have cracks in it anyway if it was properly floated. Remember that you can refloat any cracks with a damp sponge float within 24 hours of the brown coat application.
You’ll need to make sure that you get a good bond between the two different materials, so be sure to pay attention to the depth of your scratches in the brown coat. They need to be deep enough to allow the American Clay to grab hold, but not so deep that they become difficult to fill.
I prefer a roughly 1/8″ swirled groove over the entire surface and I achieve this by using a neoprene float to work the brown coat with a 3/16″ maximum grain size for my sand in that coat. You can also use what’s called a “Devil Float” to create the swirl patter during the floating process. This is a wood float with two nails placed near the tip that protrude no more than 2mm through the bottom of the float.
Be sure to fully wet the lime plaster before applying the American Clay to increase the workability and time of usage for the clay. Leaving the lime a little drier than you would for a lime finish is okay as you want the lime to mechanically draw the clay into it anyway. The process of pulling the clay tight as it draws moisture from the finish layers is acceptable in clay finishes, but not in lime finishes.
Ultimately, there is a risk of completing the finish coat before the NHL brown has fully cured. You may be fine, but I cannot guarantee that you won’t end up with cracks. I would wait as long as you can and do a proper job of curing the brown coat if I were you. That could happen in as short as ten days (the initial cure time for lime), but it could take longer too. Keep in mind that lime doesn’t reach its full cure for about a year.
For more information on Natural Hydraulic Lime please visit St. Astier’s Natural Hydraulic Lime Plaster at www.Limes.us. Please click this link for a Complete How-To Video that takes you step by step through Plastering with NHL that comes as part of our How-To Build with Straw Bale Construction video series. Happy Baling!


10 Responses
Did I confuse something? I thought you had said in previous workshops not to mix clay finish with lime as it will likely separate. Is American Clay somehow different than other clay finishes?
Hi Enga. This is a little different. This is with the clay ON TOP of the lime. The big issue of plaster failures I see over and over again is when people place earthen plaster under a lime protective finish. This is because the lime is too rigid and won’t flex as much as the clay under it. That causes the separation. If you get a solid mechanical bond between the underlying LIME and the overlaid CLAY, then you will be okay because the clay is more flexible than the lime. Hope that makes sense. Cheers.
Sort of makes sense… So, even though the two different mediums still have different expansion rates and flexibilities, having the clay as the outermost layer keeps them from separating? Somehow I didn’t get that before. If I had, I would have finished my internal walls with clay- bummer!
You still can, if you want to. You’d need to provide a mechanical bond (scratching the current finish surface to create grooves would work). Cheers
Thanks for all the invaluable info. I would like to ask a couple of questions. To start with my name is Ted and I live in central Alberta Canada. I have long planed and looked forward to building my house out of straw and have started my project with a building what I considered to be my garage. The building is up roof on and I have lived in it now up coming a year and a half. Still working on it but enjoy every minute. I am now back to exterior plastering. I needed a place to live so I made it habitable inside during the winter but now its time to get back outside to place I love. I have learned a lot over the years building a conventional home from the ground up on my own so construction and hard work is no issue. The big thing I am looking at right now is finishing the exterior plastering. Because this is the first house I’ve build with straw I thought I would experiment. I thought I’d try plastering a couple different way. So natural clay plaster is one of them. One thing I don’t have in place yet is a large overhang on my roof. The large overhang is part of the plan yes but I feel protecting the natural plaster is required first as to protect the bails themselves. Here is the big question. Is there a sealant that will repel water that you recommend for natural clay plaster and will still allow the wall to breath ? I want to mitigate erosion from rain while I finish the overhang.
Hi Ted. That’s an interesting question. You can use silicate paint to protect the plaster, but it’s expensive and not something I recommend for a temporary solution. Your best bet is to complete all the framing first and then install the bales and then plaster. If you can’t do that, then I would hang tarps to protect the plaster. Keep in mind that a thin layer of plaster is not an adequate layer of protection for the bales. You will need at least two coats to provide protection. Good luck!
Sorry for the mis information. I do have 2 coats of plaster on now and it was done the same time the bales were installed. I am more referring to the Finnish coat. There are many plastered straw homes out there with what I would consider little overhang. I’m looking for a temporary solution as I work away full time and have limited hours to work on the house. Again is there a water repelant out there that does breath.
Thanks for the update. Yes, you can use Silicate paints for that purpose. Again, they are pricey so you may want to wait until the very last minute. With two coats of plaster, you may be able to weather most any storm without the need for the paint. Plaster is quite resilient. Good luck
Thanks Andrew. Your web site is a wealth of information.
Thanks Ted!