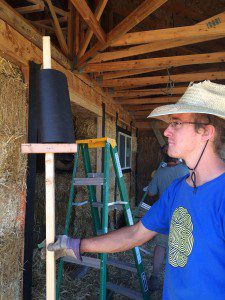
 It is important that all wood surfaces be covered with roofing felt to separate them from the plaster. If you do not do this, the plaster will adhere to the wood and will be prone to extensive cracking as the wood dries and moves over time. a typical house has a lot of wood members that will need to be isolated so the process can be time consuming. It can also go quickly with a little planning and forethought. Here’s what I suggest. Figure out the major widths of the wood components that need to be covered with the felt.
Add 4″ to that width for some overlap (I’ll tell you why in a minute). Now the roofing felt to the chop saw (use an old blade because the felt will gum it up terribly!)and cut the roll into smaller rolls matching the width you determined. Cut slowly to stop the felt from melting to itself rendering it useless. Now you have precut rolls of the size you need to move quickly through the structure. These rolls are not only cut to size, but also easier to carry around the job site and up ladders if necessary.
 Now, why did you add 4″ to the measurement of the wood members? When notching your bales, I always tell you to over cut the notch rather than under cut it. If you try and hit the notch size exactly, you will miss most of the time and the trimming of the notch in the bale is hard to accomplish well. This means the bales will be harder to get into place and the time you’ll spend trimming, fine tuning and installing your bales will be huge. If you over cut the notches, you will speed the process immensely; however, you may end up with a bunch of 1″ gaps on the outside of the structure against the posts and beams where the over cut took place.
You could stuff these, but it is hard (because they are only a few inches deep) and very time consuming (now you’re back to where you started with lost time!). The extra roofing felt (4″ over cut) acts as backing for the plaster as long as there is no more than an inch or so of space behind the felt. The other 1-3 inches of felt laps onto the bale, bridging the gap. There is no significant affect on the R-Value of the wall and the process is sped up greatly. Again, the faster you can move through the baling process, the sooner you can get the bales protected with plaster.


4 Responses
Hi Andrew
Thankyou for the wealth of information you have on your web site. We are building a straw bale house in the South West of Western Australia (Ladder Truss System). We are at the rendering stage and was very interested in your article regarding roof felt over timber. Do you know what they refer to as “Roof Felt” in Australia ?. Is it a foil with a bitumous coating ?
Regards
Nigel Pitts
Hi Nigel. That’s hard to answer as I never remember the name. Basically, you’re looking for something that will isolate the wood from the plaster. It can be a bitumous paper, or even damp course. Hope that helps.
Hi Andrew,
I’m most grateful for all the content you provide on strawbale construction. I’m actually in a very similar boat to Nigel (above comment). We are in Victoria, Australia and I’m looking for the same product?
Is there any issues using polyethylene dampcourse? I can’t seem to find any roofing felt or bituminous paper. Alternatively we have aluminium coated with bitumen?
Thanks for your advice,
James Daley
Hi James. That would be fine. The idea is simply to create a moisture proof barrier between the wood and the plaster while still providing some type of “tooth” for the plaster to grab on to. If you find that the materials you have available are too slippery to hold any plaster, you can simply add more plaster lath over the wood frame after the damp course is installed. Cheers.