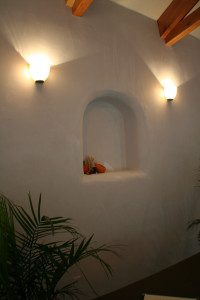
One of the most artistic expressions of a straw bale wall are the niches that are carved into it. There are about as many options of what a niche can be as there are ideas, so describing how to create each one would take just shy of forever. For that reason, I have decided to lay out a step-by-step process for the most common niche I see in straw bale homes: the arch top.
 Decide on the location for your niche. As much as it’s a good idea to lay out potential locations on your construction drawings, I always recommend that people walk the house once the bales are all in place as new locations that you had not considered before may reveal themselves.
- Pay attention to scale. Once you know where the niche will go, be sure to properly size it for the space. I suggest you use “the Golden Ratio” to determine your height to width. No matter which way you orient the niche, the ratio would be 1 to 1.618. This ratio appears all over in nature; the most commonly known example is the chambers of the nautilus shell.
 Calculate the space in and around the niche. Keep in mind that the plaster will reduce the width of the niche so be sure to add in enough “extra width” for that. Look at perpendicular walls or window and door openings and estimate where the finish walls will land so that you can properly center (or not) your niche.
- Use a cardboard template to test your niche out on the wall. Hang it with landscape pins or nails in the desired location and then take a step back to see if it is what you had hoped for.
- Mark the outside. Once you are happy with the size and location, mark the outside of the template with spray paint to transfer the shape onto the wall.
 Use a chainsaw to cut out the niche to the desired depth. I prefer to stay around 6″ – 8″ deep in a two-string bale wall and 12″ – 14″ for a three string bale wall. I mark the bar of my chainsaw with spray paint so that I know when I have plunged the blade in far enough. Be aware that you WILL cut the strings of the bales at this depth. As soon as you feel one pop, stop the chainsaw and remove the string from the area. If you don’t, it will wrap itself around the chainsaw sprocket and you will spend a lot of time unravelling it.
- Install the wire mesh on the wall (both sides) as if the niche were not there. Just go right over the top of it for now. If you try to cut the niche out before the mesh is attached top and bottom, it will weaken the mesh and you won’t be able to get it as tight as you need.
- Use wire cutters to cut the mesh out of the niche. It’s best to cut the mesh a little bigger than the opening so that your plaster lath installation is not hindered by the mesh.
 Place the section of mesh that you cut away in the back of the niche and sew it to the mesh on the opposite side of the wall with baling twine. This tightens the mesh on the opposite side of the wall and it provides extra plaster reinforcement in the niche.
- Cut a strip of plaster lath so that it fits tightly in the bottom of the niche from side to side. Cut it at least 6″ wider than the niche is deep so that you can fold the excess lath down over the face of the wall. This provides extra strength for the plaster as it turns from inside the niche to the face of the bale wall.
- Fold the lath over and secure to the mesh with tie wire, cable ties, or landscape pins (into the bales).
 Cut another strip of plaster lath (also at least 6″ wider than the niche is deep) long enough to measure from the bottom of the niche on one side to the bottom of the niche on the other side in one continuous piece. This piece will shape the arch and, once folded over on to the face of the wall, reinforce the plaster for the rest of the niche to wall transition.
- Cut the lath in small sections as necessary to conform to the shape you have created. Use stuffing behind the lath to fine tune the shape.
- Fold the lath over and secure to the mesh with tie wire, cable ties, or landscape pins (into the bales).
- Landscape pins. You may need to use some landscape pins on the interior surface of the niche to hold the lath in place. If you cut the lath big enough, you will be able to jamb it tightly into the wall and avoid the pins. Do whatever it takes to make the lath tight and sturdy. You don’t want it bouncing around when you plaster.
- Eat a lot of yogurt. Okay, that’s not entirely necessary, but the yogurt lids make the perfect plastering tool for the soft edges and tight corners of the niche. Cut the rigid part of the top off and use the pliable plastic as a curved trowel. You will proceed with the plastering the same way you would on the rest of the wall and at the same time. Just be careful when working in the niche as it is a small and delicate space that can be difficult to plaster well.
 Decorate as you will…Now you get to turn the show piece (the niche) into a vessel for other items you wish to showcase.
 Decide on the location for your niche. As much as it’s a good idea to lay out potential locations on your construction drawings, I always recommend that people walk the house once the bales are all in place as new locations that you had not considered before may reveal themselves.
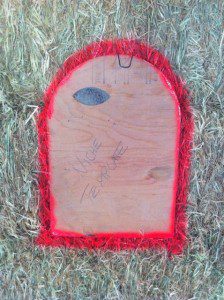 Calculate the space in and around the niche. Keep in mind that the plaster will reduce the width of the niche so be sure to add in enough “extra width” for that. Look at perpendicular walls or window and door openings and estimate where the finish walls will land so that you can properly center (or not) your niche.
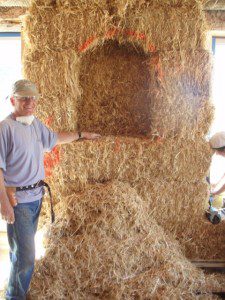 Use a chainsaw to cut out the niche to the desired depth. I prefer to stay around 6″ – 8″ deep in a two-string bale wall and 12″ – 14″ for a three string bale wall. I mark the bar of my chainsaw with spray paint so that I know when I have plunged the blade in far enough. Be aware that you WILL cut the strings of the bales at this depth. As soon as you feel one pop, stop the chainsaw and remove the string from the area. If you don’t, it will wrap itself around the chainsaw sprocket and you will spend a lot of time unravelling it.
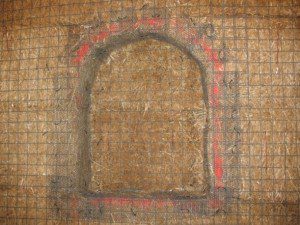 Place the section of mesh that you cut away in the back of the niche and sew it to the mesh on the opposite side of the wall with baling twine. This tightens the mesh on the opposite side of the wall and it provides extra plaster reinforcement in the niche.
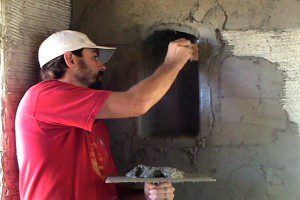 Cut another strip of plaster lath (also at least 6″ wider than the niche is deep) long enough to measure from the bottom of the niche on one side to the bottom of the niche on the other side in one continuous piece. This piece will shape the arch and, once folded over on to the face of the wall, reinforce the plaster for the rest of the niche to wall transition.
 Landscape pins. You may need to use some landscape pins on the interior surface of the niche to hold the lath in place. If you cut the lath big enough, you will be able to jamb it tightly into the wall and avoid the pins. Do whatever it takes to make the lath tight and sturdy. You don’t want it bouncing around when you plaster.
 Decorate as you will…Now you get to turn the show piece (the niche) into a vessel for other items you wish to showcase.
Even if you don’t choose an arch top niche for your straw bale home, you can transfer the steps of this tutorial to just about any style you choose. You may have to tweak a step here or there, but the overall process is the same. Happy Baling, and create something beautiful!


One Response
Many thanks, I appreciate it! |