There may be no more beautiful look than a timber frame house wrapped with straw bales and plaster. It’s as if the two were made for each other. Although the look is fantastic, the actuality of creating that look can be a bit troublesome if you don’t approach the project from the right angles. There are most definitely some differences in techniques when it comes to creating a straw bale wrap on a timber frame house. Get it wrong and the look will still be there, you will just end up more tired and frustrated than you need to be!
I can tell you that the techniques you need to include are simple and that with proper execution, you can have the look you want. What I can’t tell you, via a blog post or email, is exactly how to implement the techniques. That’s because seeing it and doing it in person is much easier than describing it in words. That said, here it goes…
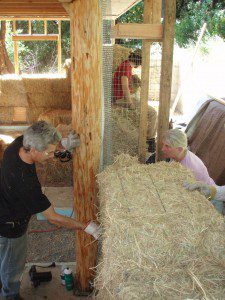
Hang it over the edges of the wood by about 3-4″. This will allow you to tie your mesh into the lath and then have a tight, structurally supported plaster/wood joint later on. You can see the lath extending beyond the edge of the post in the picture to the right (not the 2″x2″ mesh, but the tighter lath).
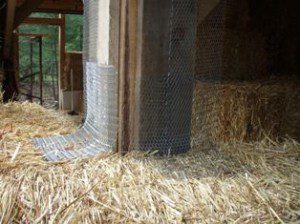
The 12″ section lays on top of the bale course and the 6″ section is stapled to the post on the back side. With the bales in place, the 12″ section is then stapled, using 9″ landscape pins to the top of the bales. This creates a positive connection between the posts and the bales. You can see an example of what I mean in the photo to the left. This is a corner on a building with bales on edge, so the lath is not as long as 12″ as mentioned above. Same concept though.
Like I said, this is not easy to describe in words, so I hope I’ve done it justice. There is more to it than this. This is just the tip of the iceberg as they say and the basics that you’ll need to know about in order to create success with this style of design. Again, the best way to learn the ins and outs is to get some hands on experience with a structure that uses this technique. If you’ll forgive the plug, I want to mention that I am teaching a seven day straw bale workshop May 16-22, 2011 on a timber frame house in Caledon, Ontario.
This would be a great opportunity for anyone interested in learning how to do this right for their own structure. I’m sure the host would be happy to answer questions about the frame itself as well. Hope to see you there, and if not, I wish you the best of success with your timber frame/straw bale project.


23 Responses
I want to do a Sunroon and straybale would work for outside wall.
Roof will be mainly solar panels.
I am in St Charles County just west of St Louis..
I am in unincorporated St Charles County and will be
doing a lot of the work myself as I have lots of time
being retired.
Hi Don. Sounds like a good project to tackle. You might want to join us in Caledon, Ontario (about 13 hours drive from you +/-) to go over the details of the timber frame.
Hey Mate ! ….I checked out the pics of the Ausi, project !…Mannnn ! they are way down under ! That clay lime plaster stuff looked very interesting ? But isn’t it kinda like our drywall compund ? And what do they do with it ? Do they mix it in with the dirt/sand ? The color of mud they were using looked like the color of dirt they had on the job LOVED IT ! …… As for the timber frame …. To me …. it just makes sense that timber frame and straw bale work together. Every day i walk my dog at a park and their is a picnic pavillion i like to look at and i find myself looking at it wondering why can’t i build a pavillion like this and then use the straw bale for infill ? It seems like a no brainer ..? … In my case i don’t want to see the verticle post (8″x8″) I just want an open beam celing . Or How about building a masonry pilaster out of block (12″ x 1 2″) I guess what I,m trying to say or ask is … The larger or stronger the post or pilaster the less material inbetween ? …. Thank You for your time ….. Jim
Hi Jim. The material we used in Australia is pure lime mixed with sand and a tiny bit of water. Drywall compound is not lime, so they are not the same stuff. he color of the sand was a beautiful red, which gave us that amazing finish color. Again, nothing but pure lime, sand and water.
The spacing for posts is not based on the size of the posts but rather the size of the beam that they support. There are several reasons why I suggest people keep their posts (and beams where possible) small and closer together. We’ll be sure to talk about that at the workshop (glad you can make it) and perhaps I can blog about those reasons later on…
I think i understund but maybe just tape short movie about That.
Hey Don,
My name is Marty and I’m a structural engineer well versed in conventional building materials but looking to shift my career towards natural building materials. I’m not sure of your time frame for your sunroom… but I’m moving to St. Louis in September and am eager to get my hands dirty any way I can. Let me know if you could use another mind and set of hard working hands!
Hi everybody!
How about the timber humidity? Drying timber to 15% humidity – quite expensive, therefore not green. Can we use a timber that just from sawmills, bearing in mind that the frame will stay a while before installing straw blocks? If we can not use the wood of natural humidity, what are the minimum requirements?
I don’t know enough about timber-framing to say. Perhaps someone else on this site does.
I read an article in MotherEarthNews about straw bales homes and find it very interesting. I would love to build a straw bale home but just don’t see that happening anytime soon. It has peaked my interest enough though to try a sunroom on the back of our family room. I am also in the St. Louis area.
Excellent! Start with something simple. Build it really well so it performs as it should, and you will likely be sold and ready to build a house! Have fun.
Timber should have no more than 7% moisture content.
I was reading the new codes that need to be addressed and adopted and there is a section that states you must apply 100 lbs. per linerar foot of wall before you plaster. We are building a post and beam frame with straw bale infills and I can’t wrap my head around how to apply that much pressure to the top couple of courses. I can see applying 100 lbs. as you go up but the last 2 courses??? Leverage maybe?? Thanks, Mike in AJ. AZ.
I typically wait until I reach the top of the wall to compress it. I make sure that my frame is anywhere from 2″ to 4″ shorter than the stack of bales that will fit into it. This way, when I get to the top course, my bales won’t fit unless crammed into place. Sometimes I can create the compression by adding the second to last and last course together, somewhat “shoe horning” the bales into place. Other times I need to use a car jack to create space for the last course of bales. It’s difficult, but a must in my opinion.
When i read it again it seems the real concern would be if you were building a load bearing wall without the frame. If you build a frame, then infill with the straw bales, the frame would support the roof. Should I be concerned about getting 100 lb compression or just get them as tight as possible?
For load bearing you would certainly need the full compression because the bales support the roof loads; however, for frame construction, you will be fine if you follow my recommendations in the last message.
Andrew, is it possible or advisable to build a strawbale/timberframe with the timber exposed on the outside? Have you done this, or is the risk of moisture getting in from the outside just too great?
Jesse. I think the risk would be too great for my comfort level. A faux frame could be used as decorative impact, but I would not want the actual frame to penetrate the exterior envelope.
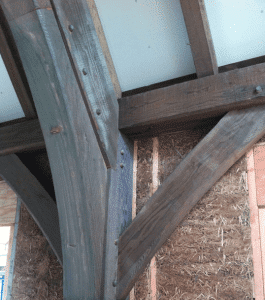
I’d like to hear you talk more about your preference for post-frame construction with smaller dimension lumber hidden in the bales. Is it primarily for ease of construction? I really like the look of exposed posts (or poles) and beams, and the simplicity wrapping the bales around the frame to avoid notching so many bales. My challenge is that as an owner builder traditional timber framing is beyond my ability. I like pole-framing but don’t want to bury poles or use treated ones. Are there other options for sturctural a system that uses larger dimension posts (8×8 or bigger)? It looks like the picture above depicts an exposed pole on the inside of the bales, but I can’t see how it’s braced or what the rest of the framing system looks like. Thanks for your thoughts!
You can certainly use 8×8 posts and simply attach them with steel unions (Simpson or custom, for example). Keep in mind though that wrapping a structure and leaving the posts and beams exposed speeds up the process because there is less notching; however, it slows it down in other places: plaster, attaching the bales to the frame, and the remaining notching at windows and doors. I don’t know that I would say it is faster, just different.
Do you have any more material describing this process? I’m not fully understanding. The pictures are very tiny. How does adding the lath create more of a tight joint, aren’t you creating a gap by adding it? I’m planning to build a timber frame house, and am considering straw-bale instead of SiPs, but am finding very little info on the process. Your article is one of the few that describes it! Any more info you could provide would be helpful.
I may have a couple articles on the site about timber frame other than what you found here. To be honest, it’s been a while since I’ve searched my own site! 🙂
The straw absorbs the lath into its surface due to the “loose” straw, so there is no gap created. What it does do is tie the bales tightly to the frame and keep everything in place. Without it, the bales can lean away from the frame, this creating weak joints and plaster failures. Sorry the pictures are so small. I’ll see if I can make them bigger once you click on them…
Was thinking the same thing as R. Sampson.
Sadly, the pictures are still small 🙁
Unfortunately, I don’t know what I did with the original photos so I can’t make them bigger. I tried enlarging the ones I have on the site but they get too diffused. I’ll add new photos on the next timber frame structure I work on. I think I’ll have some good ones from the Adirondacks workshop in August. Maybe you want to join us there…? You can CLICK HERE for info on that workshop if you’re interested.