Adding shingles to gable walls may not seem like a straw bale specific topic at first glance. That doesn’t mean it’s not an important skill for you to learn for several reasons. First and foremost, a lot of straw bale houses use shingles on the gable end walls. They do so to add a complementary texture to the plaster of the bale walls. The following step-by-step guide will give you the information you need to install shingles properly. Well installed shingles will last for generations to come. Perhaps you already have shingles in place that need some love and care. Either way, this post will help you create a quality shingle job.
Secondly, I show you how to identify a bad flashing job and give you some details of proper flashing techniques. This is something you can use throughout your building career, not just when reshingling. Finally (not finally really because I’m sure there are a ton of other reasons to learn this cool skill), you can build your construction confidence and know that you too can do a job like this. Every time you realize that you can do something construction related, all of your building skills increase with that confidence. So let’s check it out!
Starting Point
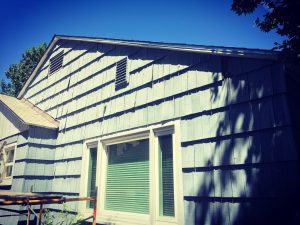
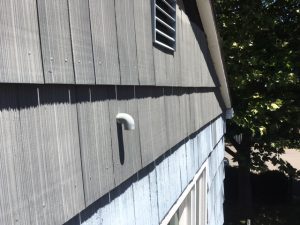
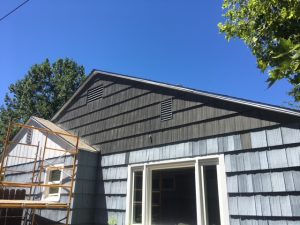
Here’s what the house looked like before I got started reshingling the gable walls. You can see that there is fairly significant deterioration of the shingles in several places. The first story wall is in reasonably good shape and it’s just the gable that’s showing its age. This could be because the gable is more exposed to the elements or because the installation was not done well. Upon further inspection, I found some things that certainly show a lack of understanding regarding the flashing details. That lack of understanding could very well have carried over into the overall installation.
The Importance of Proper Flashing Details
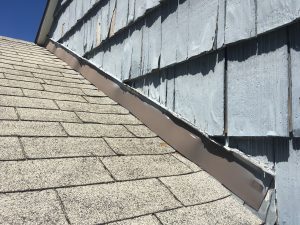 You probably already know that flashing is a vital part of a home’s construction. Without proper flashing detailing, water can and will find its way into your home. The photo to the right shows part one of the problem with the flashing on this house. Can you spot it? The issue is that the flashing has been installed on top of the siding, not underneath it as is required for it to properly function. Picture a drop, or a deluge, of water washing down the surface of this shingled gable. When it meets the flashing, it will continue to wash down the face of the shingles and will end up behind the flashing, whose job it is to stop water from entering your house.
You must install your flashing so that water will be directed away from the house, not into it. In this specific case, the flashing is installed in the wrong order (on top of the siding, not behind it), is upside down (the 90 degree bend is on top, creating a flat surface on which water can pool), and is 100% reliant on the caulking between the flashing and siding. This is doomed to fail.
Wall to Roof Transition Flashing
 So how should this have been done correctly? This is jumping ahead a bit from the rest of the demo job, but it’s an important detail to get right when adding shingles to gable walls, so let’s hit it now. The first thing is to strip the walls down to the subsiding: the sheathing or skip sheathing, depending on what’s there and what code requires. Remove all shingles, backer shingles, nails, paper, and any other debris. Once there, install what’s called “step flashing”. This is where an individual piece of right-angle flashing is placed against the wall, and simultaneously slipped under the roofing material on the adjacent roof, one shingle course at a time. This is the best way to ensure that no water makes it into the house by sliding down the wall or by pooling on top of the roof. This can be difficult to install in a remodel or repair job as the existing roof shingles along the wall must be lifted and modified to allow for the flashing. That said, it’s worth doing right!
Push Water Away
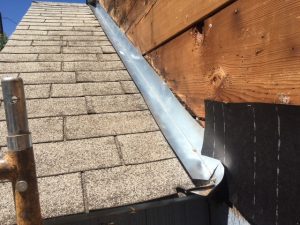
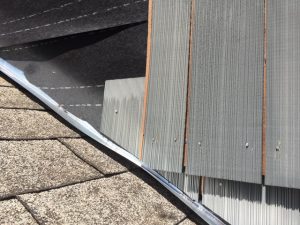
 In this case, I placed a continuous right-angle flashing over the existing roof and against the wall and was able to avoid installing new step flashing. The only reason I was able to do this was that there was existing step flashing in place from many years ago that was still in reasonable shape. It was not in good enough shape to stand on its own, but with the additional piece of right angle flashing, the assembly was good to go.
You can also see that I added a bend in the bottom of the flashing that will direct the water away from the wall. In other words, as water slides down the flashing, it won’t simply drip down the wall below. Instead, it will be pushed away from the wall by this flashing detail. It can be hard to see, but the bend in the flashing is installed completely underneath the last roof shingle so that if water backs up in the bend for some reason (leaves or other debris), it won’t penetrate the roof and ultimately, the house itself. This is hard to do when reshingling gable walls because you can’t always lift the bottom shingle without damaging it beyond repair. I was able to make it work in this case, although some minor damage did occur in the process.
Waterproof the Wall
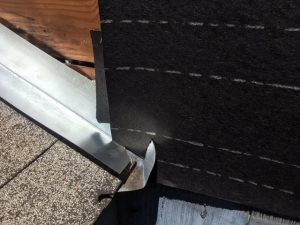
 The next step is to continue the waterproofing of the wall by adding roofing felt, or a similar product, to the entire prepped wall surface. In this case, I used 30# roofing felt. Install the felt from the bottom up and make sure to overlap it onto the existing shingles below in a way that will allow water to drip away from the wall, not behind the shingles and into the wall. Be as precise as you can be with any and all wall penetrations so you don’t increase the risk of water getting behind the shingles. I always cut things a bit too tight at first and then adjust out to the proper cuts little by little. This allows me to “sneak up on the perfect fit.” Be sure to overlap the consecutive layers of felt per manufacturer’s specifications. I recommend at least 6-8″ of overlap on a vertical wall surface, to be safe.
Backer Shingles
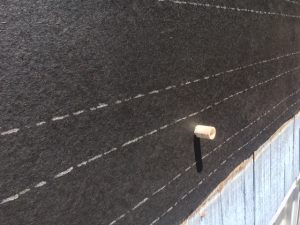
 It’s important to know and properly layout your gable shingle exposure. In other words, you want to match the existing patterns of the shingles in terms of siding exposure, or how much shingle is showing in each course. Snap a chalk line on the top of the existing shingles to identify the location of the next backer course and then install the backer shingles one course at a time. Notice that the backer shingles are anything but uniform, so any chalk lines should be struck on the bottom of the shingle course such that you can line up the shingles properly.
The backer shingles should be spaced according to manufacturer’s specifications: roughly 1/8″ – 1/4″ apart, as should the finish shingles. In this situation, the backer shingles are held up about 1/2″ above the final placement of the finish shingles in order to produce a shadow line within the layout. This helps us snap chalk lines at the bottom of the backer shingle course without seeing those chalk lines on the completed job. Use a minimum of 2 nails per shingle and a third nail on shingles wider than 10″. Install those nails roughly 2-3″ above the bottom of the shingle and 1/2″ minimum from the shingle edges.
Shadow Lines and Spacing
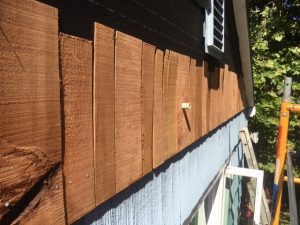
 You can see in the photo to the left how the shingle spacing creates a shadow line. If you look closely, you can see that the brown backer shingles are about 1/2″ higher than the finish shingles. There are a couple other important factors to see in this photo. Let’s go back to the discussion on flashing. Did you notice that the roofing felt extends over the top flange of the metal flashing, directing water away from the wall? Did you also notice that the finish shingles also extend over the flashing? If you recall how the original flashing was installed, it was placed on top of the shingles. I corrected that issue with the new installation.
Another detail to pay attention to is that I didn’t cut the angled shingles to fit tightly against the flashing. Instead, I left about 1″ gap between the two. It doesn’t look like it’s that big of a gap in this photo, but it is indeed about 1″. This eliminates the risk of the shingles wicking water up off of the flashing and will increase the life of the shingle job.
Stagger the Joints
 Once again, be sure to check with the manufacturer on what they recommend for gap spacing. In this case, I’m not talking about the expansion joint between two neighboring finish shingles or backer shingles. Instead, I’m talking about the joint spacing from one course to the next, i.e. a course above another. Those joints must not line up. In fact, they need to stagger by at least 1 1/2″ from one course to the next. More space is even better. Continue this spacing throughout the entire job. It will mean that you have to resize shingles with a hatchet, knife, or saw to make them fit properly. The main focus needs to be on maintaining the staggered joints between courses. At the same time, be sure to maintain the 1/8″ – 1/4″ spacing in between neighboring shingles. Believe it or not, this can get hard at times when adding shingles. Be sure to pay close attention and double check everything at each shingle before nailing it in place.
 Adding shingles to gable walls is not an easy job by any means. It takes time, is finicky, and the details all matter. That said, it’s something that you can do with some preplanning, patience, and a desire to improve your overall construction skills. At the end of the day, you’ll have learned a new skill and protected your house for years to come. That’s worth celebrating! Sit back and enjoy the new view. Pat yourself on the back and feel the increased confidence that came with the job!
If you’re ready to go to the next level and want to start building your own straw bale house, please check out our instant download video series. It covers everything from pouring a concrete slab foundation to framing your bale house, to baling it, and plastering it. It’s all there for you to watch on your own time from the comfort of your home. You can get ALL FIVE VIDEOS, so check it out today by clicking HERE.

