 Windows are one of the most risk prone and failure prone areas of a house, conventional or straw bale. In fact, any penetration in the exterior wall is at risk of water infiltration and thus failure. Most contractors are aware of the risks associated with this area of construction yet they do not fully understand how to minimize that risk.
I have seen countless articles in trade magazines like Fine Home Building and the Journal of Light Construction showing professionals how to properly flash a window. Inevitably, contractors wrap the house wrap on the wrong side of the flashing or improperly flash the window in general. This is speaking of conventional construction of course as neither of those two publications deal much with straw bale construction yet. Notice I say “yet.”
Here are some common mistakes:
1. Flashing installed from the top down, allowing water to get behind the layers of flashing.
2. No counter flashing installed. This is the flashing placed before the window is installed.
3. Wrapping the layers of waterproofing in the wrong order which allows water in.
4. Nail thought the flashing close to the window, thus penetrating the seal.
5. Nailing through the flashing as described above and then pulling the nail out to reposition it.
6. (SB specific) Insetting the windows from the exterior face of the wall.
The most common mistake is not counter flashing windows at all. The belief is that today’s flashing is so good that we no longer need to counter flash our openings. I disagree. For the 5 minutes per window it takes and the $2 in materials per window, I believe it is worthy insurance. Without it, you are relying 100% on the single layer of flashing to hold up without any wiggle room for leaks or failure. Know this: water has an uncanny knack for finding its way into houses. Do whatever you can to protect your investment well.
A quick discussion on window placement. Many folks love the adobe look created by setting windows roughly 6″ back into the bale wall. This exterior sill gives the home facade some texture and depth; however, it increases the risk of failure. Although I like the look of this architectural detail, I do not build that way. I place my windows flush to the exterior of the wall. Here’s my reason. If the flashing fails in the inset window, any water will leak directly onto the top of the bales below the opening.
This means the water will soak into the sponge-like bale for months if not years before you know you have a leak. The section of wall beneath and adjacent to that leaky window will be ruined by the time you know there is a problem. If the flashing fails in a flush mounted window, the leak will drain directly into the plaster. You will start to notice staining below the window in the plaster or even a constantly wet section of plaster. This will be an early clue that something is wrong and will allow you to address the problem before it is too late.
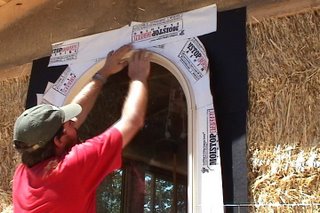
The following steps to applying proper counter flashing are better learned in person. I will attempt to detail it for you here:
1. Use adhesive bich-a-theen (I have no idea how to spell that properly so I went phonetically!) This material is black and fully adhesive. It works best when it is warm and pliable.
2. Cut squares off the roll for each corner. You will need 2 pieces per corner.
3. Start at the bottom and place one square in the corner. Cut one side of it diagonally from the corner to the joint of the sill/trimmer stud. Stick it down.
4. Use another square and cut from the opposite corner of the square to the same joint. Stick it down. Make sure no wood shows in the corner. By placing two squares cut in opposite directions, you should have completely seal the corner.
5. Do the other bottom corner the same way.
6. Cut a piece to fit the bottom sill. It will wrap into the window opening a bit and overhang the trimmer stud on each side by about 6″.
I know that is a really hard way to learn counter flashing. Sorry. I teach this in my workshops, and you can certainly visit a contractor on site and ask for a quick lesson or just watch what they do. Make sure your contractor/teacher knows what they are doing. Take this blog entry as notes to ensure they are tip top.


8 Responses
Andrew,
After much planning, the dream is becoming reality and our strawbale house is in process. Next week we are hoping to get the bales stacked. In your articles and videos, and most of the strawbale books out there, window flashing with tar paper and mesh/blood lathe is the recommended method. Yet, the major book on natural plaster strongly recommends against this method claiming it is not a good surface for plaster, and will likely lead to cracking. Instead, it recommends packing around windows with a cob (straw/clay) mixture, and then plastering. Given I’m a couple of weeks away from this step, I was wondering if you have any comments about the natural plaster method? Have the houses you’ve built with your method seemed to hold up well around the windows? My gut feeling is that the natural plaster is too focused on the plaster in and of itself and is ignoring the issue of water penetration. Any thoughts
Hi Todd. I think that eliminating the flashing would be a terrible idea. Water infiltration around windows and doors is the biggest risk of straw bale construction. I like the idea of using cob as a backing, but I in no way believe that it is a better backing than plaster lath. It has been used on plaster houses all over the world for many years and is still the best backing for all plasters, conventional and natural alike in my opinion.
Andrew,
Inasmuch as our electrician lost my post-beam SB DVD (yeah, well at least he did the electrical work in the straw bales correctly!), would you consider putting the section concerning flashing on YouTube? I think I remember it, but it’s way too important to do incorrectly and I “see” it better if I can actually see it, rather than just read about it.
Hi Lynn. I am pretty slammed right now working on a big project. I will certainly keep this in mind and will try and post something about flashing in the future.
What type of windows do you recommend. What about vynil windows?
HI Edie. There are a lot of considerations to take into account when choosing windows. Not the least of which are efficiency, budget, aesthetics, and function. Personally, if the budget allows, I choose wood windows with an exterior aluminum cladding. I like these because they are highly efficient (at least the ones I buy which are produced locally) are very attractive, have limited maintenance once installed, and are very functional. I can get them in any style from casement and picture to awning and double hung. The fact that they are built right here in the Northwest is appealing as well.
Vinyl windows have come a long way and are great, especially if the budget is somewhat fixed. They are very easy to install, can be highly efficient and attractive, and very functional. Be sure to purchase a quality vinyl window though as the cheap ones won’t perform the way you will likely want them to. Of course the biggest downside to a vinyl window is that it’s vinyl. The production of vinyl is very hard on the planet and the people who work in the industry. The toxic effects of vinyl production have been well documented elsewhere, so I won’t go into that here; however, I do think it’s something that needs to be weighed ion the equation.
would you be able to make a how to video for windows & doors?
Regards,
Andrew
Hi Andrew. Thanks for the idea. I am so busy right now that I don’t have time to do that; however, you can check out a blog post I made for flashing windows in a tiny house here. The big difference is that we don’t use house wrap in straw bale, so that aspect is a mute point. The other details are the same and would be helpful for you to see.