When building curved walls, some of the most difficult aspects to deal with are those that don’t naturally curve. For example, large windows in a curved wall will create an area where the window either sits inside the plane of the wall or outside that plane. There is no way to bend the window, other than buying expensive curved windows, so you have to get creative in how you finish the window installation. You might add an over sized sill to handle the difference, or hang the whole thing out side the plane of the wall with a creative faux finish. It’s up to you.
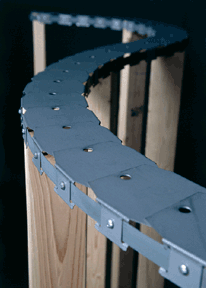
One place that can be difficult is in the mudsills, or toe ups as they are often referred to in straw bale construction. As you can see in the photo above, bendable steel channel sills have been created to make the framing of conventional curved walls easy. These sills work great for stick framed homes and I have used them on several houses with great success. The problem for us bale builders is that the steel channel does not provide adequate nailing surface for the attachment of our mesh, nor does it give us any uplift for the bales to get them above the foundation or floor system. We need something else.

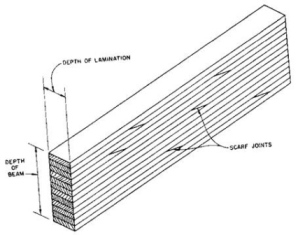
In the above photo, you can see how a scarf joint is used at the linear connection points of the laminates. This gives a positive glue joint from end to end of the plywood as well as face to face. Be sure to stagger any end joints by at least two feet.
By creating a simple template for the curve, you can use a router or jigsaw to cut many layers in the exact same shape. Once the whole assembly is put together, you can move it to the location in which is is to be installed. Don’t try and do the entire sill in one big circle, using scarf joints all the way around. It will end up driving you crazy. Instead, create manageable lengths that can be laid in place like any other toe up/mudsill system. Use anchor bolts as you would with other systems to hold the mudsills in place.


4 Responses
We are hay dealers located in Elgin , Okla. with a large supply of wheat straw . We have many bales sizes from round to 4X4X8 , 3X4X8 and 3X3X8 . we also have the ability to slice the big bales to the followinf sizes . 4ft X 16in X 4ft , 4ft X 22in X 16In , 24in X 16IN X 22in and 22in X 16 In X 16 in . That being said we can mix and match differant bale sizes to fit the builders needs .
Thanks
Phillip Q McCracken
I remember reading a book a few months ago about “storybook” design houses. One architect/builder used leaded diamond shaped windows in curved walls that were his trademark. Think old England here. Because of the shape of the glass and the leading, it gave some flexibility with the shaping of the windows. Most of these houses were built in Californa in the 20’s and 30’s when Hollywood was just getting started and the craftsman bungalow was starting to feel “old school” to some. (can’t understand that!) Most of these houses featured round turreted entry ways with witches hat roofs, cat-slide roofs, niches in walls, wroght iron work especially for lighting fixtures and those dripping candle light fixtures that you can sometimes find at architectual salvage shops. Other features included shake roofs that were wrapped around the eaves to resemble thatched roofs, shakes laid out in a wave manner, and “eyebrow” windows which if laid out in a certain manner gives the house a face. The Great Depression put an end to most of this form, although some people are incorporating some “storybook” features in homes today. Many of the small houses had lots of castle like features that made them look very odd as the houses were so small. Some of the larger ones though had interesting layouts including curved walls with full wall of curved leaded diamond shaped windows. Of course then folks didn’t think about or even have insulated glass, double or triple panes or even gas inside the windows. As most of these houses were built in California (but not all) extreme weather was not a consideration either. The houses I saw in that book used the curved wall as a wide passage way from one part of the house to another with tile floors and a brick wall which if oriented in the right direction could serve well in a strawbale house as a solar collector room. If I remember correctly that’s what the builder did back then with the brick. They do make leadless caming for “leaded glass” windows now days so environmentally and healthwise it would not be a bad choice, but the price would be the difficult part unless you wanted to build your own windows. I would suggest you do it before you start your house if you are doing that yourself as you won’t have weeks to sit and cut, fit, solder etc. but results could be amazing.
I don’t know what you mean by a “scarf joint,” at the “linear connection points,”. One of the problems I have in trying to learn about construction is that most of the articles assume knowledge of the terminology. When you use words or phrases like those you might as well be speaking Greek. I don’t know what you are talking about so the lessons are lost on me.
Hi Allen. Thanks for this. It’s easy for me to forget about the language barrier not only between trades people and those new to construction, but also for those in different countries. Thanks for the reminder. A scarf joint is one where the ends of two adjoining pieces of lumber (trim, framing, etc…) are cut on an angle from the face of the material to the back of the material. One is cut one direction and the other piece is cut the opposite direction. In this way, when you put them together, they overlap on a diagonal line. The joint, from the top of the material to the bottom, is a straight line, but on top of the material you can see the 45 degree diagonal line. This helps hide any shrinkage in the joint over time. The linear connection point was a reference to the place where the two pieces meet, in a line…i.e. end to end. Hope that helps.