If you’re like most people interested in straw bale construction, you’ve likely wondered about hanging pictures on a plaster wall. How do I do it? Won’t the plaster crack? Will I make a mess? Can the picture be moved and the hole patched? These are some of the most common questions I’m asked all the time regarding the ins and outs of hanging pictures on a plaster wall. In fact, it’s not just pictures that have people concerned. Folks also wonder how to hang cabinets, large pieces of artwork, or even heavy mirrors.
There are a few different approaches to hanging pictures on a plaster wall, and a more sturdy option for those heavier items mentioned above. Let’s start with pictures and move our way up the scale to heavier items after that.
Hanging Pictures on a Plaster Wall
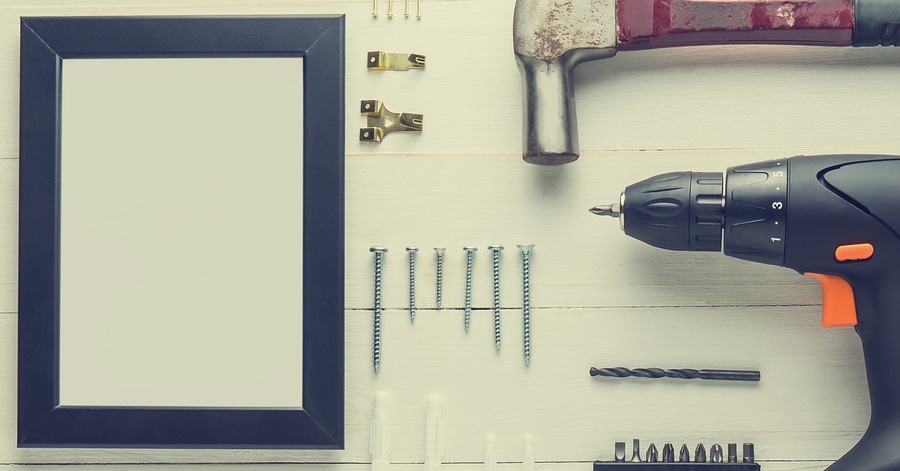 The most obvious approach, although not actually obvious because of the different wall construction details, is to use picture hangers like the brass hangers in the photo to the right. I know…who’d a thunk it, right? Well it just so happens that using the ordinary angled nail trick works perfectly well on plastered walls. There are, however, a couple caveats to consider. First, be sure to drill a pilot hole for the nail so that you don’t crack the plaster. Chances are good that on relatively fresh plaster (under a year if using lime), you won’t crack the plaster without drilling the pilot hole, but why risk it? A simple drill and masonry bit can save you the gamble.
Secondly, the picture hangers are somewhat limited in their holding capacity. This is not due to the plaster, but to the weight rating of the hanging assembly itself. In most cases, even the most stout picture hanger won’t hold much more than 90 pounds (41 kg). Having a sense of how much the item to be hung actually weighs is therefore very important. In fact, knowing that number before you start building is the best approach so that you can add specific backing if needed. More on this below under hanging heavy items.
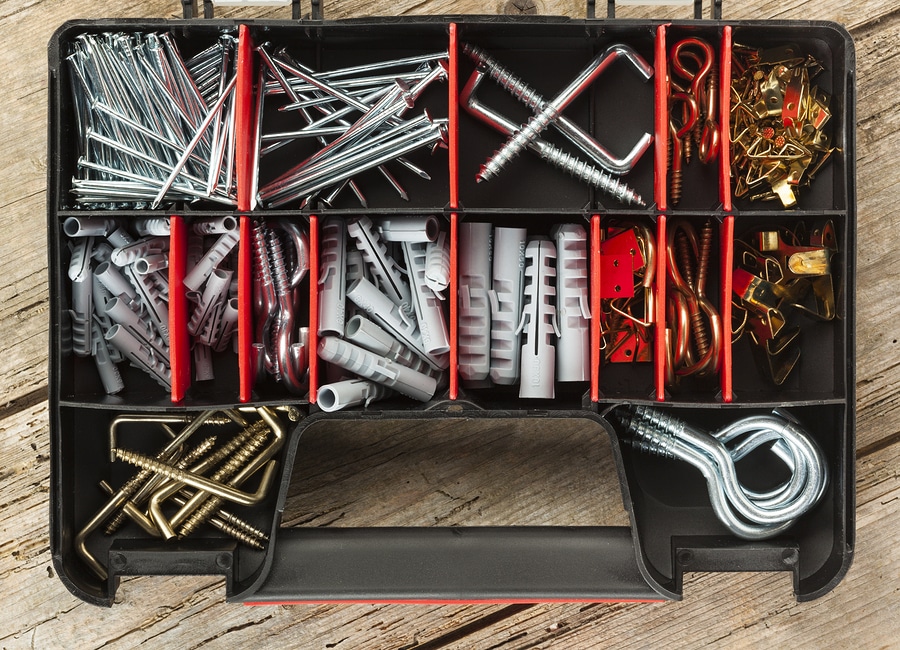 Another option is to use wall anchors and a screw or hook, like those shown in the picture to the left. There are lots of types of wall anchors to choose from; however, some are easier to use than others. The best types to consider are masonry wall anchors, like the white ones shown in the picture to the left (in the center two bins), or masonry screw-in anchors that screw into a predrilled hole in the wall. These options are great because they don’t require any space to expand into a hollow wall cavity like typical wall anchors. They simply rely on the high strength of the plaster to provide excellent holding strength.
Regardless of which option you choose here, be sure to place the tiniest dab of caulking over the hole before you insert the screw or hook. This will twist into the hole and seal it up so that moisture is not driven into the bale walls through the penetration. Keeping your walls sealed up against moisture intrusion is paramount, and even a tiny hole for a picture can become a cumulative problem if you have enough holes.
Avoiding Holes in Your Wall
 No matter which option you choose for hanging pictures on a plaster wall, you run the risk of leaving an ugly hole behind should you ever decide to move the frame. This is especially troubling if you have lime plaster (my personal favorite wall covering for a straw bale house, by the way) because those holes cannot be easily hidden upon repair. For more on lime plaster and how you can receive a BIG DISCOUNT on your material order, CLICK HERE. This is because the lime plaster on the wall will have already cured, before you attempt to patch the hole with fresh plaster. The two materials will never blend together perfectly and you’ll be left with a permanent “burn mark” on the plaster. The only way to ensure your patch is perfectly blended and hidden is to skim the entire wall with a fresh finish coat after you complete your patch job. Let’s face it, that’s more work than most of us want to do every time we move a picture!
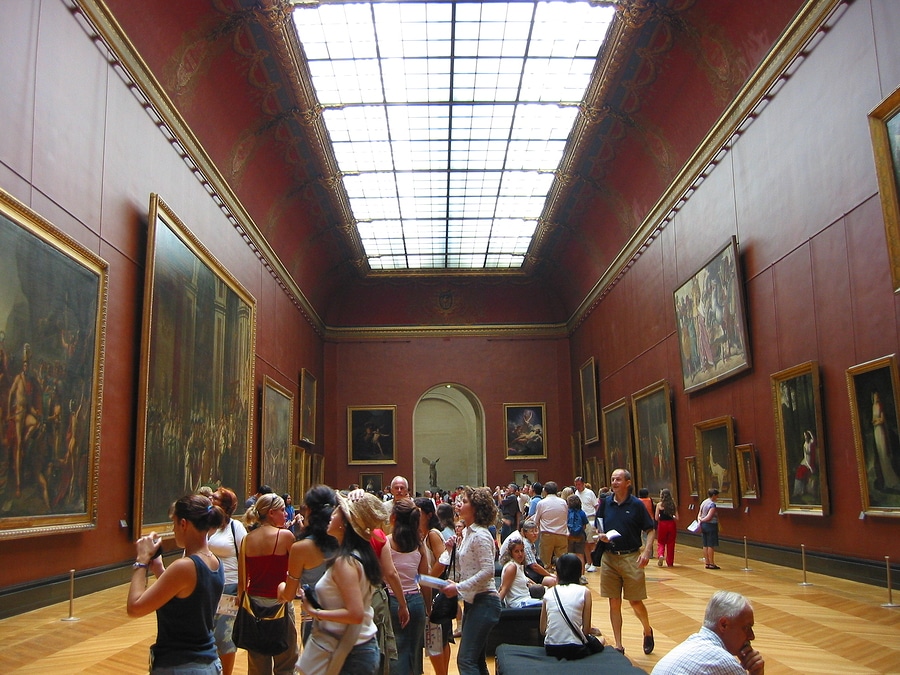 Fear not, there is another option! If you know you are (or even think you might be) the kind of person who is likely to move your artwork around from time to time, then plan ahead during your build. Install some wood backing in the wall and some finish trim over it and the plaster. This will allow you to use a picture rail system instead of penetrating the plaster with individual screws or nails. The photo to the left is from the Louvre in Paris, so this is not exactly new technology. Can you see the thin lines above each picture that extend up the wall to a thin horizontal rail? Those are exactly what I recommend for you in your bale home. A simple picture rail installed in the top third of the wall height can give you the freedom to move art all over the place without ever damaging your plaster wall. The vertical cables that extend from the rail allow you to hang your artwork at whatever height you choose.
Hanging Heavy Items
 Pictures are one thing, but what about hanging heavy things like kitchen cabinets or that solid gold mirror you got from your great aunt on your wedding day? Those need something stronger. The best way to accomplish this is to pre-plan for it during the bale raising. Yes, you’ll have to actually pay attention during the bale raising to things that won’t be put in place for many weeks. It’s something I always tell people when building a house. Consider it to be like a chess game. You need to be 11 moves ahead at all times to have the best chance of success.
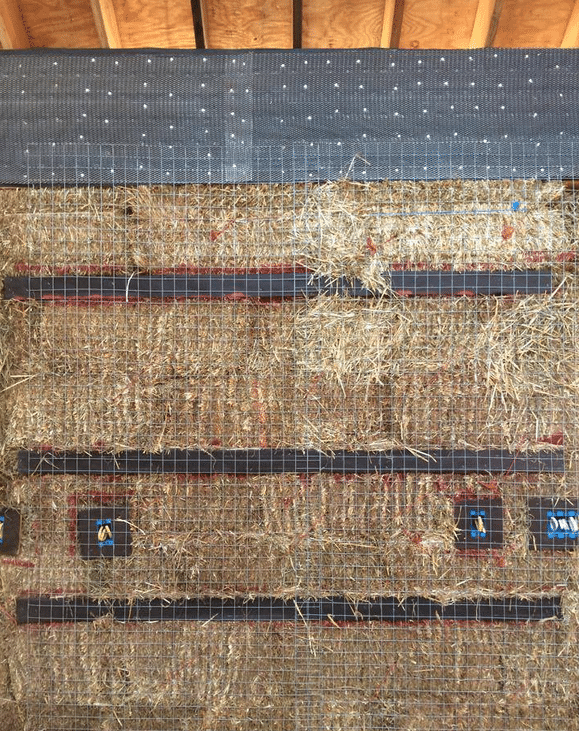
The trick is to add 2×4 backers or nailers underneath the mesh, as shown in the picture to the right. This way, the mesh holds the backers in place and there is no way they could ever pop out or slip down the wall. They are completely locked in position forever and will provide tons of holding strength for years to come. Here’s how to install them:
- Identify the precise location for the backing. I try to land my attachment point in the center of whatever backer material I hang (2×4, 2×6, etc.). The more accurate you are the better.
- Make sure they are level and the spray paint the outline onto the bales.
- Cut out the area so that the backer will ultimately lay flush with the face of the wall when installed. I use a chainsaw for this job, but you can use whatever tool you’re most comfortable with.
- Cover the face of the backer with roofing felt to separate the wood from the plaster so to eliminate risk of plaster cracks.
- Install the backers and tie them through the wall with baling twine. This is just a temporary fix, so you only need a couple ties per board. It’s just enough to hold them in place until the mesh is installed.
- Quick tip* If the backers will be used to hold items that have electrical nearby, like kitchen cabinets, be sure to cut out the straw for the backers and then cut out and install the electrical work before you install the backers as noted in step number 5. This way, you can be sure that your electrical lines are safely 2″ (minimum) from the back of the nailer so that there’s no chance of hitting the wire with a screw later on.
- Install the mesh on the wall. Ignore the backers at this point. Just pretend they’re not even there while you install the mesh tightly to the wall.
- Once again ensure the backers are level and staple the mesh to them along the length of the wood. Every 6″ or so is adequate.
- Sew the mesh through the wall as you would everywhere else (18″ on center both directions) to tighten the mesh around the backers.
- Be sure to take photos of the backers on the wall as they will be hidden behind the scratch coat of plaster soon. Use a tape measure to show their exact height and location along the wall.
- Quick tip* Take photos of everything during your build. Having a file of photographic evidence of every stage of construction is incredibly helpful when you need to locate something in the wall down the line. Gone are the days of owner-builders wondering aloud “I can’t find it, but I’m pretty sure I installed an electrical outlet somewhere in this wall…”
This is the same method I would use to install the backing for a picture rail, by the way. Although your individual pictures may not be that heavy, the sum of their weights could be. As such, you want to make sure you have plenty of support behind the plaster to handle the beauty that will adorn it. Oh, and for curtains, you’re best off using masonry screw-in anchors and screws to hold the rails in place. It’s hard to install backing so close to a window (although it can be done), and it’s usually just easier to deal with the curtains during the decoration phase. That way you’ll have lots of location options available to you in case you change you’re mind on size and scale.
You can learn all kinds of cool tricks and trade secrets about straw bale construction by attending one of our hands on workshops. We not only cover everything related to building a bale house, but we have a blast in the process and you’ll make connections with lots of other folks with a similar passion for healthy housing. Check out our current workshop schedule by CLICKING HERE. Hope to see you at a workshop soon!
If you have other ideas for hanging pictures on a plaster wall, or hanging anything for that matter, please add your input to the comments below. Happy baling!


7 Responses
Just an additional suggestion for hanging curtains.
We take the usual Morrison-style window lintel box (2×4 timber box shape clad in OSB) but change the design by extending the timber piece on the inside face of the box so that it sticks out some distance (say, 30 cm) either side of the window opening. It makes it a little trickier to fit the bales around the window opening, but it’s not too bad. After the usual felt, mesh, and plaster application you’ve got a nice solid piece of wood just under the plaster in the exact spot you’d want for a curtain rail.
Hi Jason. Thanks for sharing this. That’s a great way to create backing for the curtains.
Thanks Andrew! Another fantastically helpful piece.
Hi Andrew,
Can I clarify exactly why you use felt over timber, if it these things:
1. to stop the plaster making contact to avoid expansion and shrinkage with heat.
2. to stop the timber absorbing moisture from the plaster when wet.
If so, would a coat of paint on the timber do the same thing?
Hi Julie. It’s multi purpose, but in a nutshell we are accomplishing the following:
1. Stopping the plaster from adhering to the wood. The wood expands and contracts over time and the plaster (although flexible) will crack at the boarders of the wood if it is adhered to it.
2.The felt acts as a vapor barrier, stopping any vapor from entering into the house through the plaster and wood transition. This is secondary as the plaster itself does a great job of minimizing the vapor movement.
3. The felt is slightly textured so it helps the plaster adhere to the building (again, not the wood) by providing some tooth behind the 2×2 welded wire mesh.
I don’t see paint working as well as felt, primarily for the first and last reasons listed above. The paint will move equally to the amount the wood moves, so it wouldn’t stop the cracking at the boarders. Felt is attached to the wood, but can move independently of it. The paint would be a smooth surface and would make adhesion even harder for the plaster, not easier. Hope that helps.
How to find studs or beams after? Also related to covering the holes, how do I tell what kind of plaster is used? (Just bought a small hay bale house so I’m clueless!!….learning fast tho)
Hi Ben, Locating wooden elements under plaster can be very difficult if you are unsure of where they exist in the first place. Plaster is typically too dense for a stud finder to work, and knocking on the wall to distinguish between something solid versus a hollow voids is a losing battle too. If you have a set of construction documents or floor plans, you may be able to decipher where wooden structural elements may be located. Being clued into where to check is the first place to start.
Determining what type of plaster has been used can sometimes be tricky too. Cementitious and lime plasters are often difficult to distinguish apart, but filling holes would be treated the same. Clay plasters tend to be softer than cement and lime-based plasters and easier to identify. To fill a clay plaster hole, you can use new or leftover clay plaster.