
Mr. Murphy sure seems to have a thing for bales. Bales arrive on site, and out of a clear blue sky, a rain cloud will perk up. You can never be too careful about protecting your bales for construction!
Have a Plan to Protect Your Bales
Quality straw bales are an investment in your future home’s insulation and energy efficiency, yet until they are installed and plastered, they can be vulnerable to the elements. (Sometimes, it is as if a fresh stack of bales is a rain magnet!)
You want to have a protection plan in place before bales are on-site to avoid moisture reaching your strawbale stack from above, the sides, and below. Here’s how you can keep your bales safe and construction sound.

Timing
If you can, leave your bales at the source as long as possible if the source has a dry barn and is agreeable to providing storage for your purchased bales. This avoids having to store them on the job site while you are still framing, moving equipment around, or preparing for bale installation. Straw bales take up space and are more likely to be damaged the longer they “hang around.” Deliver the bales near the time you plan to start baling.
However, If the bales will be left unprotected at the source, then you may want to have the bales delivered so you can ensure that they are protected.

Job-site Arrival & Staging
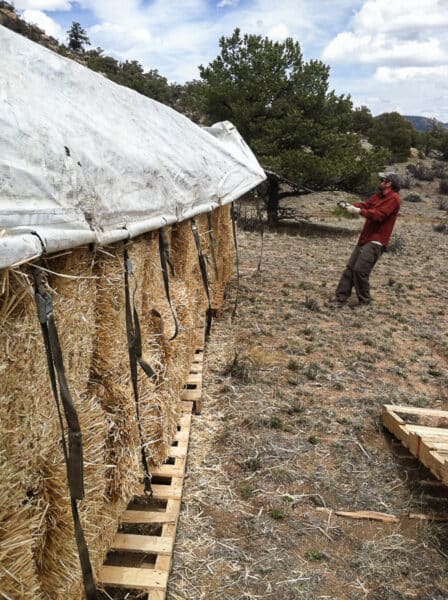
Prior to delivery, have all the equipment (pallets, tie-downs, tarps, etc.) on hand. Inspect the tarp for holes, especially if reusing or repurposing older coverings. (The image above shows the start of some fresh green shoots growing out of a wet spot created by a hole in a repurposed tarp.)
When bales are delivered to the site, they are either stacked by hand or in a large block called a squeeze block.
Trade Tip
When unloading a stack of bales that are tall, like a squeeze block, it is best to make a slide. Take a couple of 2x12s that are long enough to reach the top of the stack while still providing a relatively gentle slope.
Once at the top of the stack, climb up and use the ramp to slide the bales to another person on the ground. This keeps the bales from getting knocked out of shape and speeds the delivery to your stacking crew. Just be careful not to stand at the bottom of the ramp!
Ready For Bale Installation?
When the bales are delivered, immediately distribute them around the site so that you will not have to carry them around the house just to install them. It is a little extra work at the moment but will ultimately speed up the construction of your project.
Prepare the mini-stack locations ahead of delivery with pallets to keep the bales off the ground.
Once you have distributed the bales to the mini-stacks, cover them with quality tarps.
To thwart Mr. Murphy and his unexpected wind events, we suggest you consider anchoring the sides of the tarps down. Leave the sides of the bale stack exposed to the air so that any moisture that builds up under the tarps can be eliminated by air circulation.
Stack the bales in a pyramid. That way, any rain from above, or condensation on the underside of the tarp, will slide down the tarp and drip off the edge onto the ground – safely avoiding soaking into the bales!
Not Ready to Install The Bales Yet?
If you need to receive the bales before you are ready to use them, you can find a dry spot on your land and put them in one area on top of pallets. The pallets help keep the bottom course of bales out of the grass or away from the moisture of the ground. For situations where you may see a lot of moisture, it may be worth considering using two layers of pallets.
Stack the bales like a pyramid and cover them well with quality tarps. (In the holey tarp example above, the bales were stacked with a flat top. This allowed water to collect in a depression and drain through the hole, soaking the bales from the top to the bottom of the stack, making those bales destined for garden use only.)
We recommend using “Hay Tarps” because they are big, stout, and come with reinforced attachment points along the edges for anchoring. The last thing you want to do is skimp on the tarps and find your entire order of bales damaged by rain. See more examples of Hay Tarps below in the FAQs.
Leave the sides open for air circulation, as shown below. This allows the wind and air to dry the bales from any condensation that may find its way in from under the tarps. If wind-driven rain is in the forecast, then you can cover the sides until the storm is over and open it back up again to help with drying.
Trade Tip
Ensure moisture draining off the tarp is evenly dispersed and doesn't accumulate or channel onto your bales by creating a dripline away from the stack's edge.
Timbo’s Stack-tastic Method


Trade Tip
Following the alternating bale stacking in the diagram above, locks the bales in place and makes for a more stable stack, which is safer to work around and on.
More on Ground Protection
Note that in Timbo’s drawings (above) the bales are turned on edge on the bottom row. This is for the Murphy mice that like to run under bale stacks and naughtily gnaw the twine in half, leaving you to retie your bales!
It is incredible how much ground moisture a bale will pull up. More than discoloration, it can lead to mold, decomposition, and growth. A simple protective measure you can take is to always stack the bales on pallets to get them off the ground. If you don’t elevate the bottom layer of bales, over time, the straw will turn to compost.
If the bales are to be stacked over grass or other plant life for longer periods, put a layer of 6 mil plastic or weed cloth down first, then the pallets, and then the bales. The plastic or cloth will kill the grass, but it will also stop it from growing up into your bales.
In a High Wind Area?
Honestly, it can be hard to leave the sides open if the winds are strong in your area. If that is the case and the bales will only be stored for a short time, then you can leave the sides somewhat unprotected, assuming the weather is not terrible. The sides of the bales can handle some moisture.
You want to keep the tops of the bales 100% dry. Water on the side of a bale can only penetrate so far into the bale, and it can then be pushed out again on a dry day.
During Installation
If the top of a bale gets wet, gravity pulls the moisture down into the bale, where it is hard to drive out. This can cause rot and long-term damage.
If the weather will be bad when you are baling, consider making accommodations, such as, covered walk ways from the bale stack to the house with tarps so that the bales kept covered.
FAQ
Conclusion
Jokes about Murphy’s Law aside, the ultimate goal is to minimize the waste of quality bales for use in construction. Having a bale protection plan in mind before bales are on site and doing periodic checks while stored will keep as many of those bales as possible insulating your straw house walls and out of the garden!
Want to learn more about straw bale houses and about building one?
Want to do so for FREE?
Sign up for our totally free 16-Day Straw Bale e-course!
Find out more & sign up HERE.


10 Responses
Thanks for this! It’s just what I was looking for…
In my experience, we had the bales delivered the from the farmer in a transport trailer. It was easy, because we used local straw from two small farms, we had a local transport company drop off a trailer at one of the farms (they were neighbouring farms) when the straw was ready for us it was then packed into the trailer by the farms (approx. 502 bales 2 twine). Just a call is all it took to pick up the packed trailer then droped off at our site for storage.They were stored in there for us to use the following year. When the bales were needed they were easy to get with the ramp we built,only lost a few bales because of a small hole in the roof of the trailer. All in all it was a perfect storage bin for the straw. The cost for the use of the trailer for the year was economical and well worth the peace of mind knowing that our bales were here and ready when needed
Very cool Susan. I like that idea. I hope more people are able to accomplish that system in their local markets.
A further question. Our neighbour is growing 60 acres of wheat this year(2011), and we were planning on starting construction in the spring of 2013. We have the barn space, but most of the barn floor gets wet and will form an ice layer in the spring. It forms ice typically in February and is dry again by mid May. I had the idea myself of having a double layer of pallets underneath. In a case like this, does anyone have any recommendations on going to a triple layer of pallets, or other suggestions?
Alan. Double pallets will give you adequate lift off of the floor. The biggest concern I have is during the thawing period. What happens to all the water? Does it drain off or sit there. If it sits there, that’s a lot of moisture in the air for the bales to soak in should conditions be right. If it drains away or if you can shop-vac it out, then I see no problems.
Thanks, and a further update. There is probably quite high moisture in the air for a couple of weeks. What happens is as the water moves through, it freezes at night and creates a dam to block and hold further water. Eventually once things are fully thawed, the water runs off. While the ice dams are there, we are at the mercy of the weather. For this reason, and other reasons also, we are talking about spending to have a ditch dug in between the back fields and the built-up area (including the barn). That, and a bit of banking the soil at strategic places should greatly reduce the water, but will not be able to see the result until after the bales are already in the barn. During the summer however, the barn is so dry that any soil inside becomes dust.
Andrew, Murphy’s law struck today. Yesterday we had winds of 35mph gusting to 50mph. The walls are up and the box beam in place, cinched down with strapping and the trusses installed, but it was just too dangerous to finish installing the decking in that wind. Of course it rained this morning…
Given that the tops of the bales are covered by the box beam (filled with fiberglass batts and lined with felt), should the walls still be okay?
A warning to others, we had plenty of sunny dry weather to get this roof on, but the truss supplier repeatedly failed to deliver the trusses…After the third “delay” we opted to build the trusses onsite. This delay burned through our window of dry weather and lead to this disaster. Tarping sounds easy enough, but in those winds it would have been impossible to install tarps (or for them to remain in place even if you got them installed) so even though I had tarps onsite…The walls were still left exposed to the rain.
This goes to show both the perils of load bearing construction and how the best laid plans can be thwarted by circumstances beyond your control.
Sorry to hear that Bob. I suggest that you get the roof sheathing and roofing on as quickly as possible at this point. I would also check the bales directly underneath the box beam to see if they are wet. Use a bale moisture meter with a probe to investigate. If the bales are wet, get some fans set up to keep a strong wind on them. This will help to dry them out. In the end, you will likely have a few bales that may need to be replaced but the majority will probably be fine. Again, the quicker you protect them, and the sooner you get the wind blowing on them, the smaller the damage will be. Good luck.
Thanks Andrew. I went out to check on the house and the straw on the walls actually feels dry to the touch, but there may still be moisture deeper into the bale. The rain came through early this morning (lasted maybe an hour and half before daylight at my home about 30 miles south of the buidling site) and we’ve had winds in the 15mph range during the day and the sun came out as well.
Winds are forcast to be light and the weather dry and sunny for the next several days. We’ll have it decked and roofed soon.
That’s all good news. I would definitely recommend getting (borrowing if need be) a moisture meter to check the middle of the bales. That is the hardest part to dry out and the most dangerous part to leave in place if wet.