 Where welded wire mesh is used as the structural shear of a building, it is very important that temporary braces be used to secure the building before the mesh is applied. This is a common practice with conventional construction as well. 2×4 braces are used to support the walls and maintain a plumb line until the plywood is added. In a bale house, the system is a bit harder to deal with.
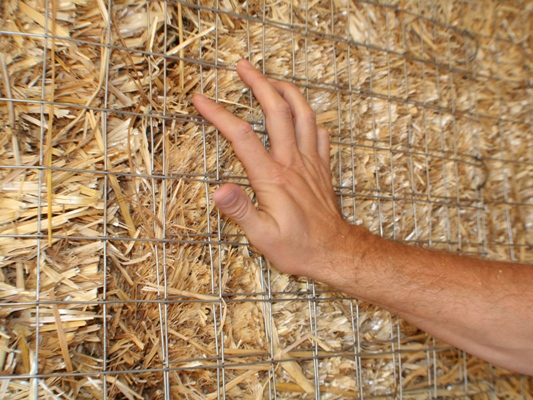
Consider the placement of the temporary braces. If the braces are placed on the inside of the frame, they will need to be removed when stacking the bales and the structure ends up free of lateral support. If the braces are placed on the exterior of the building, they need to be removed before the exterior mesh is installed. The exterior mesh holds the greatest amount of strength for the structure as it is fastened directly to the vertical framing as well as the top and bottom plates. The interior mesh is only attached to the plates and then sewn to the exterior mesh. Therefore, the mesh with the greatest strength has to be installed for the interior mesh to work at full capacity.
So how to deal with this dilemma? I install my braces on the outside of the frame during construction. The first pieces of mesh are placed on the interior faces of the wall after baling. They are placed as close to directly opposite of the temporary braces as possible. Once all of the interior slices of mesh have been fully installed, move to the exterior. I remove one brace at a time from the exterior and immediately install the mesh. I continue to install the mesh as I move down the wall until I get to the next brace.
Only after all the mesh on the outside of the wall has been installed from the last brace do I remove the next brace. I continue down the wall in this fashion, never removing more braces than I can mesh up to. This gives me continued lateral support throughout the meshing process and limits the risk of the walls falling out of plumb.


3 Responses
Hey Andrew, I want to build a 7 ft high wall and put as much glaxing as I can afford on the south side(nearly 40 liner ft). I am wondering if I will comprimise the shear support of the limited mesh ( about a foot on the bottom and one one the top of the windows)?
The shear strength is definitely affected by the removal of the mesh. You need to have continuous connection from the toe up to the header beam for the system to be effective. Adding the windows will mean that you have to address the shear in another way. I suggest you use Hardy Frames (www.HardyFrame.com) as required by code to satisfy the shear requirements. The frame supplier can tell you how many and what size you will need. This will allow you to add the most window space in the wall possible without sacrificing the integrity of the wall.
Andrew,
I put a lot of thought into this issue when I designed my new straw bale house. I set parralel sill plates (12 inches apart) on the floor. Then my 6X6 posts were set right against the house side of the inside plate. The support beam was let into the outside of the posts so that the outside face is plumb to the house side of the inside sill plate. Braces were attached to the inside of the posts. I was able to install the interior mesh to the outside of the posts, the house side of the lower inside sill plate, and the outside of the beam, without removing the interior bracing. Each succeeding mesh panel (we used 2X4 welded wire fencing) was firmly attached to the next, with a 6 inch overlap, with hog rings every foot down the overlap.
While I could probably remove the bracing at this point, I decided to leave it in. I have stacked the straw, installed the window/door bucks, and stretched the exterior mesh, all without reloacting the bracing. I plan to stucco the exterior wall as soon as the weather breaks a bit. I will remove the interior bracing at that time.
Meanwhile, I have moved inside and begun plumbing and wiring. The braces remain in the interior, and I don’t expect them to impede progress until I start actually finishing the interior walls.
My first straw bale house design required constantly relocating bracing as the construction progressed, and I put a lot of thought into this particular problem in the current house design.