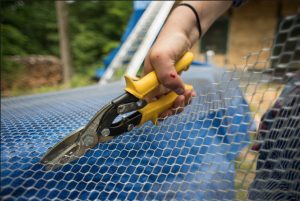
For a long time my crew has used the same mesh (2″x2″ 14 gauge welded wire mesh) for shaping bales around window and door openings. It has always worked very well; however, I have recently found a situation in which that can be quite problematic for the plastering process.
If the straw is not packed tightly into the mesh, there is not enough backing for the plaster to hang on. On the other hand, if the space if packed too tightly, then the straw tends to lay very flat to the mesh which does not provide enough tooth for the plaster to attach to. Unfortunately, this need for the perfect stuff can be difficult for the first time baler and can have very frustrating results in the end for the plaster crew. This is especially true on the lids above the windows and doors on the interior of the home where the mud continuously falls off, time and again.
One way to deal with this is to use blood lath (plaster lath) as the shaping material for shaping bales around windows and doors. I do not think this would be needed on the sides of the openings as a little persistence usually provides solid attachment for the plaster, no matter what the stuffing because the mesh itself can support the plaster.
The blood lath is dangerous to work with and a bit pricey, but in the end you will likely be happy that the mud is actually staying where you place it. Another key is to make sure the plaster is sticky. For example, if using lime plaster, make sure that you have a lime rich mix for above the windows and doors as a sandy mix will not adhere as well as a lime rich one.


11 Responses
Hi Andrew,
I love the dvd and the website. Thank you! My partner and I are building a post and beam straw bale house in Manitoba right now. We are using NHL 5.0 (harsh climate) for scratch and brown and NHL 3.5 for the finish coat. What ratio would you suggest for the lime-rich mix you refer to for plastering door and window lids? We are baling now and will be plastering in two weeks. Any advice on cold weather lime plastering other than heating and hoarding? We’ve had frost and a freezing night or two already. Any advice is greatly appreciated. Thank you.
The most important thing is that you not allow the plaster to freeze within 72 hours of applying it. Make sure to protect it from low temperatures by wrapping the house or providing adequate heat to keep freezing away. IN terms of the overhead application, I have learned over the years that the same ratio can be used as long as the application technique is good and the backing is strong. I use the 2×2 mesh over the entire box beam and then apply a layer of plaster lath. This way there is more room behind the plaster lath to allow the plaster to grip. I don’t change my mix ratios at all anymore with this set up. When applying, make sure to use strong force to place the mud and only apply a little at a time, building up the coat as you go. Too much mud right away is too heavy and will fall. Finally, build from the edges in to the middle so that the plaster is in contact with previously placed plaster the whole time. This helps it stick better. Good luck!
Thank you. I will follow your advice. We are planning to use a combination of blood lath for window & door shaping and 2 x 2 galvanized mesh for corners and for a couple of sections of wall that could use some extra support (16 feet, no windows) until they’re plastered. We were hoping to go without mesh for the most part otherwise. Any thoughts? We’re considering doing only one or two coats of plaster this year (colour coat next summer), leaving the tarps up as long as possible after the heaters have been removed. We hope to maintain a temperature of 6+ degrees Celsius during plastering (interior and exterior) and for at least a couple of weeks after the last coat. Can we safely get away with just a scratch coat (about 5/8″ – 3/4″) or is a scratch and brown coat best? We have 36″ overhangs (but three 16′ tall gable walls – west, north and south) and are surrounded and protected by a forest of 40′ trees on all sides but south. The house is built on a 48″ icf wall so well off the ground (but tall). Our winters are often -35 to -45 celsius (without windchill factor) and we usually get a lot of precipitation, mostly snow. I look forward to your response. Thank you again for your time and advice. So appreciated!
You can get away with just the scratch coat, but if you can safely complete the brown coat as well, I would suggest it. That will, of course, depend on the temperatures. The fact that you have such cold winters is actually good once the plaster cures because it means the air will be very dry. Even the precipitation (snow) will be dry at that temperature I expect. The biggest risk is living in a house that is only partially plastered. First off, you can build up moisture in the walls (cooking, showering, etc…) and secondly, the heating system may not keep up with the demands without the plaster fully completed. There are too many potential leaks in the vapor seal to keep the heat in when a building is not plastered completely. The color coat won’t impact that much, but the inclusion or exclusion of the brown coat will.
In terms of mesh, I am a huge fan of using it throughout the structure for many reasons. I use it to reinforce my plaster, provide out of plane strength to the wall, add shear strength, hang cabinets, install electrical, tighten up the walls, and much more. If it were my house, I would use it everywhere. If you want to avoid it, I understand, but like I say, if it were my house…
🙂
Thank you Andrew. That makes perfect sense. We were planning on using mesh and/or blood lath in the key areas you mentioned (behind cabinets, for electrical, around corners, windows and doors) so your advice certainly backs us up. My partner built a jig for custom cutting narrower, shorter bales to fit in at the top of our wall (next to the header beam). It works beautifully. Our walls are now very strong and tight and we’re very pleased. Thank you again.
I’d love to see/hear more about the jig.
Hi Andrew, we’re hoping you’ll clarify something for us in regards to counter flashing for windows. Our windows are being installed in three days. We are planning to use 9″ wide adhesive flashing for our counter flashing and flashing for the windows (plus galvanized steel for the headers and perimeter). On the post and beam infill dvd, you show the counter flashing being installed only on the bottom (extending 6″ up the sides) before window installation and then again around the bottom, sides and top after the window’s been installed. In a couple of articles here on the website, you suggest applying the adhesive flashing first on the bottom, then up the sides, then at the top before the windows are installed and then a second layer of the same – bottom, sides then top. Which is best? It seems that overflashing is better than underflashing. Please advise. Thank you!
Update: Windows won’t be in until early next week. Hope to hear from you soon! Thanks!
Good question about the flashing. For the counter flashing only the bottom, extending up 6″, is necessary. Be sure to do the small corner patches first and then the long stretch. You can add the sides if you want, but don’t do the top in the counter flashing. That’s actually not a good thing to do. In fact, can you tell me where it says to do that on my site so I can change the post? Thanks.
For the final flashing: you only need a 4″ piece at most as you don’t want it to extend onto the straw. Do the bottom, the sides and then the top adding a metal flash only on top and then one more adhesive flashing over the metal to seal it all off.
Thank you for clarifying that. The articles I was referring to are called “Counter Flashing Windows” and “Window and Door Flashing”. I’d be happy to email some photos and info on the jig, where shall I send the email? Take care and thanks again. I really appreciate your taking the time to answer our many questions. 🙂
Thanks. I’ll look into that next week when I get back from teaching the Straw Bale Design Seminar in Denver. You can send the photos to me at [email protected]. Looking forward to seeing them.