Why Your Foundation is THE Most Important Part of Your Strawbale House

Written By Timbo
May 19, 2023

It may seem like a simple part of the overall construction process, but your foundation is the most crucial part of your entire project. Any mistakes you make in your straw bale house foundation will only get worse as you build up. It’s known as compounding defects, and it means that mistakes begin to pile upon one another, making the problem worse.

Finished pour of a straw bale home foundation

Here’s an example: You notice that your slab foundation is 3/4” out of square when you start framing. It’s also 1/2” out of level across the total building. You figure, “Well, I can handle that. I’ll just adjust it in the framing.”

After completing framing, you’re on the roof and notice that the building is now 1” out of square and 3/4” out of level. Bummer. But you figure you can capture it in the roof framing. By the time your metal roof shows up, the square panels don’t fit on your out-of-square roof, and you have “to make it work.” In the end, everyone and your grandmother can see that the roof is out of square. That simple mistake in your foundation has ruined the look of the house. This happens and becomes a permanent feature of the home. A “simple” mistake that gets worse and worse as a builder goes up in the construction process.

Your foundation deserves the highest focus and attention to detail because your entire house sits on top of it! If you skimp here and something fails, it’s not an easy fix. Is it worth the extra few dollars to add a bit more rebar to the slab? Yes. Is it worth having an engineer, at the very least, review the foundation design? Yes.

Straw bale home foundation being poured

Ensuring that your foundation is built to the very best standards possible is very much worth the extra time and attention to detail. When done properly it saves you the headache and expenses of dealing with those compounding defects, or worse yet, a failure down the road. Luckily, there are LOTS of examples of foundations done properly and plenty of resources to get this crucial step in your straw bale house build to produce the result you want.

Here are some simple things to look out for when building your foundation and/or slab.

Tips on Building Your Strawbale House Foundation

1 – Make sure that the rebar is the correct size, lapping sufficiently, and is laid out in the proper spacing for your soil and geological conditions. A typical residential house in the United States uses #4 or #5 rebar in the foundation walls and #3 in the slab on an 18”x18” grid pattern. The layout for the foundation rebar depends on the size of foundation wall and the local codes.

2 – Do NOT allow any rebar to “daylight” or even come close. No rebar should end or be placed within 4” of the edge of the concrete. Rebar closer than that can draw moisture from the outside and rust. That rust will creep down the rebar and, over time, render the entire rebar system useless. As it is the rebar that provides the tensile strength to the structure, not the concrete itself, compromised rebar is less than optimal!
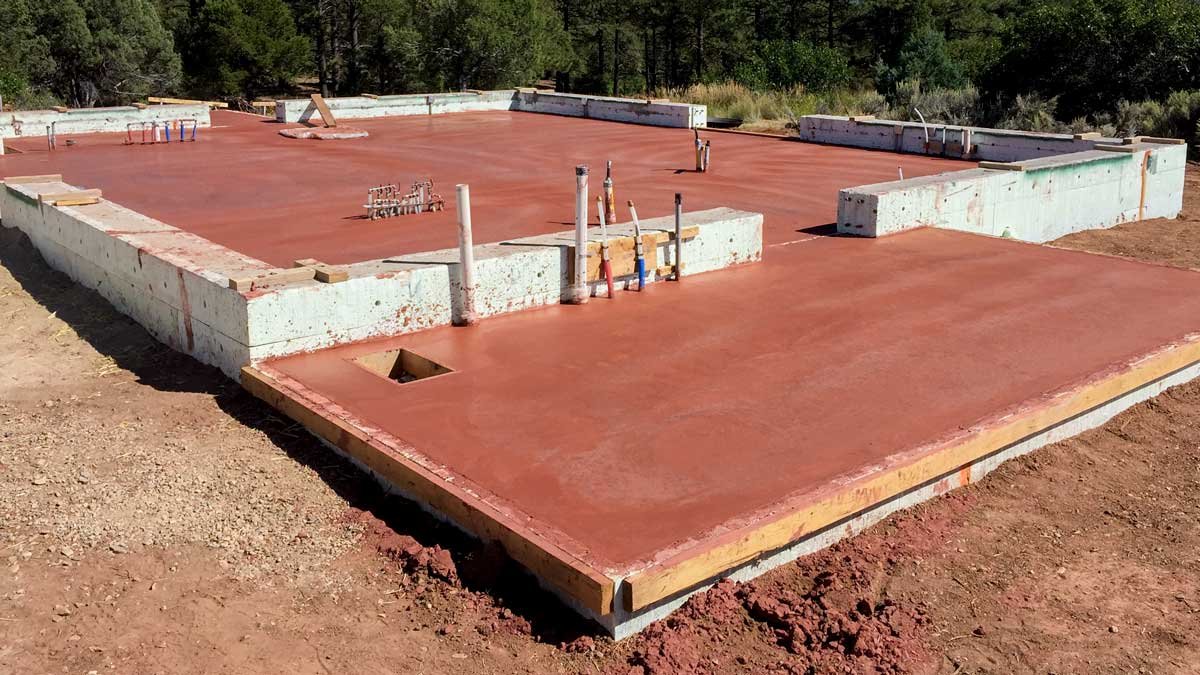
3 – Pay extra attention to the layout of your foundation and slab. Make sure that the corners are square and level. The closer to perfect you are, the better. In NO case should you be more than 1/4” out of square or level for a roughly 2000 SF house. Use a laser level if you have one or the best standby of all time: a water level. It’s the cheapest level you’ll ever buy. It’s basically some clear plastic tubing, water, and a little red food coloring to help you see the level lines better. You can even use it by yourself. (Here’s a reference from wikiHow on How to Use a Water Level.)
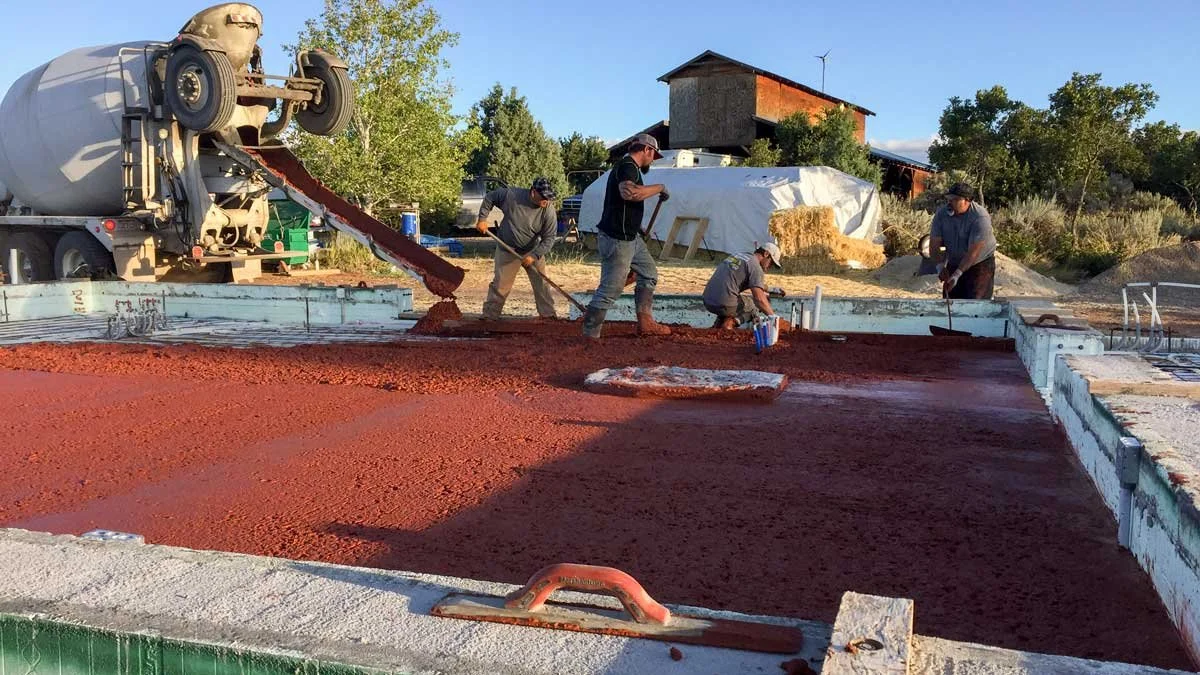
4 – Wait until the water has evaporated off of the top of the slab BEFORE you start finish troweling. Pressing that water back into the surface of the concrete will weaken it. Allow the concrete to first cast off the water it doesn’t “want” and then get on it for the finish work.

Foundation Troweling

5 – Planning to acid stain your concrete? Be sure not to over-finish the surface. If you polish the surface too much, you will seal it beyond what the acid stain can react with. You can definitely get the surface smooth, don’t get me wrong, the key is not to power trowel the heck out of the slab.

6 – Use a stepped foundation when applicable to minimize concrete use. If you have a sloped site, step the foundation up or down the hillside to work with the topography. Be sure to measure the steps and keep them in line with the straw bale courses so you can more easily step the bales down without a lot of custom work. This can be accounted for in the design phase. This won’t apply in all straw bale house foundations, but if it does, it’s great to get it right when stepping the foundation to keep your bale work easy.

7 – Spend some extra time on the areas near your foundation bolts when finishing the slab. Many people don’t put a lot of attention here because they figure, “it will be buried in the wall, so who cares if it looks good.” This is one of those sneaky places for a compounding defect to impact you later. For example, when you try to add your 4×4 toe-ups to a series of foundation bolts sticking out of poorly finished concrete, you will quickly find that the 4x4s won’t sit flat. The thick 4×4’s won’t bend like a 2×4 to fit flat either, so you will be left with a toe up that’s up in the air in some spots and flat in others. This not only allows for air gaps through which bugs can also travel but also messes up the framing before you even start it. Finish those areas well, and you will be happy you did.

8 – Use Wedge Bolts or other “after-cure” anchors for the interior toe-ups. By adding the interior anchor bolts after the concrete has been finished, you can get a better finish on the concrete (not only for the bolts as described in #7, but also for your floor, which will come very close to the anchor bolt locations). Using the drill-in bolts also makes the layout and installation of the interior toe-up a lot easier and more accurate. (Here’s more on Anchor Bolts.)

9 – Be sure to vibrate your form boards to eliminate “honeycombing” of the concrete. This not only improves the strength of the wall but increases the beauty. This can be as simple as pounding a hammer against the form boards while the concrete is still wet. Do this BEFORE you finish the surface, as the vibration can make the surface of the concrete drop a bit.

10 – Use adequate bracing for your concrete pours. There is nothing worse than having a form board blow out during a pour. If a board blows out, more concrete will be used, and your nice straight line will be shot. Use lots of diagonal braces to support the forms during the pour.

strawbale home foundation footers

You can learn even more about pouring foundations in our comprehensive How-To Instruction Video Series.

It contains over 10.5 hours of top-notch, professional quality instruction on everything from foundations to framing, to baling (post and beam and load bearing), to plaster.

All delivered instantly to your inbox.

IPad displaying man cutting strawbales

16 Essential Steps to Straw Bale Success

FREE 16 Day E-Course

Straw bale workshop participants applying cob plaster

Post Comments

23 Responses

  1. Hey, Andrew!
    Hope all is well with you and your family. I had such a great time at the workshop in Tennessee last summer. I decided to pass on the land I was considering last fall. It just didn’t have enough level land to suit my plans. But, I do keep looking! Here’s a question: Do you send out your blog posts as you write them, or do I have to remember to go to your website and look for them?

    All the best to you in 2012!

    Kim

    1. Hi Kim. I do send out newsletters from time to time with some links to blog entries, but I don’t link to every entry I write. I suggest you check back when you can. You can always scroll through the entries from time to time. Hope you are well!

  2. Kim – Andrew does have an RSS feed available for his blog page; you can pop that into your homepage’s reader or newsfeed(or use onle of the handy “add to” buttons also on the blog sidebar if one matches your homepage) and then you’ll have a box on your homepage that will let you know at a glance when there is an update. I hope that helps; not sure how techie you are or if you have a techie friend or relative to help… 🙂

  3. Hi Andrew! My partner and I are planning to build a strawbale home this summer and we are considering adding a ponywall to the foundation to raise the bales a little higher off the ground as we live in Northwestern Ontario and we get a lot of snow (concerned about bottom course of bales being under snow for part of the year on whatever side of the house the window gusts against). However, building a pony wall thick enough to hold the strawbales means adding a lot more concrete to our build. Could we use rocks to in-fill the concrete forms of the pony walls, then pour the concrete in (we’d do this in lifts and tamp down the concrete to ensure no air pockets)? Does that sound reasonable or very risky?

    1. That can be done if the building department approves it. There are risks involved, but it should be possible. I think a better way to go might be to add a lot of used concrete chunks to the forms and then pour a thin concrete slurry around all of it. use a vibrating machine to be sure that everything settles in and fills properly.

  4. Hi All. I realize this article was a number of months ago, but it seems you know quite a bit about foundation work, so I was hoping you might have advice for us. We don’t know where to turn for second opinions.

    Here’s the doozy.

    After two years of preparation work, we finally got our house build moving forward. 1200 sq ft foot print. Everything seemed to be going well. Our builder subcontracted the foundation work. They poured the footings, built the forms, and about 9 days after footings were poured, the walls got poured. Major frustration aside, we found out today that the concrete workers were about 2 feet short on a wall. They measured wrong and now need to add concrete to an already-poured-wall that is about 20 feet wide. We are pissed to say the least. Our builder is taking the structural engineer up there to assess how to handle this. The weather is changing and freezing temperatures are due in about 8 days. Do you have any experience in this type of mistake, and if so is it possible to have a solid foundation wall that is “patched”? ie. wet concrete poured onto drier concrete. Please help with any advice….

    1. Hi Sarah. Sorry for the frustration. Things like that are very disappointing, especially when the excitement of building is interrupted. They should be able to add the necessary correction to the wall without too much trouble. I would expect the engineer to require that the new concrete be “tied into” the poured concrete via metal rods of some type. It’s not uncommon to join concrete in this way, although not as ideal as a correct pour would have been. Once “joined” mechanically, there should not be a structural issue at all moving forward. Good luck and let’s hope it’s all good news moving forward…

  5. Hello we got a bad contractor and the interiorfoundation walls have honeycombs and a cold joint around the entire perimeter. We do not know how the exterior is because he backfilled. And to make matters worse decided to leave out the drainage around footing. (Water table is 0-10′) so his solution for drainage is
    3’x12″ of 3″ rock around the entire perimeter. It does not make any sense to me. And the was the figuring of lbs. Per sq.in. ilof load ranges on paper same from backfill to all that gravel? And the concrete not being vibrated and showing honeycombs as well as the cold joint be effected by the weight of all that rock
    They are side by side. The concrete engineer and contractor say its cosmetic but I’m not buying it since he told me the issues were only on interior and the exterior concrete is fine and its just filling in with mud and done. No structural problems to worry about. Our house is from 1901 and 28’x47′ and crooked as well as bowed. Is this guy a liar and my foundation compromised? Because for $260+ thousand it should be grandeur and solid as a rock in my book. How do I found out extent of air pockets in a 8″ thick wall if he only plans on fixing one side. And since there is no technology to look into wall we will just have to ride on his warranty. That helps me sleep good at night okay???
    Buy American!!!
    An earthquake is coming soon I can feel it. Are we doomed with this poor excuse of a foundation that was poured by them?

    1. Sorry you’re having this challenge. The good news is that honeycombing is not a big deal if that’s the extent of the issue. In other words, it’s not uncommon to see surficial honeycombing on concrete. That can be fixed by simply hitting the sides of the forms with a hammer while the concrete is wet. It’s not about voids in the middle, just surficial finish. That said, if there are bigger issues INSIDE the wall, that could be a problem, but there’s no way for me to know that.

      Cold joints aren’t a big deal either as long as there is adequate rebar in the foundation. After all, concrete does not have a good tensile strength, thus the need for rebar to hold things together.

      In terms of the drainage. the gravel will work…for a while. If there is no landscape fabric over the rock, it will eventually fill with silt and no longer drain properly. If it’s wrapped in fabric, it will be fine. It’s an old-school way of providing drainage. It needs to actually drain TO somewhere though. Having a trench around teh house filled with gravel will only allow water to flow into that trench. If it has an outlet (sloped to drain downhill, or sloped to drain to a dry well) then you will be fine.

      Being that I only have the information you provided and have not seen the project first hand, my comments are all best case scenario suggestions. To really get a solid answer, I recommend you bring in an engineer or inspector to look at the areas of concern. They can give you direct advice on what’s best based on what is happening on scene, much more than my distance advice. Good luck.

  6. Hi Andrew,

    Our contractor dug 3.6m width but as the concrete was being poured the sides started to cave causing uneven area and a very wonky foundation. It is now 3.3m and to rectify it he is saying he will dig a new footing right beside it and add metal rods from the old concrete (just been poured) to the new one. How would he go about this also is this the right way?

    Thanks,

    Ash

    1. Hi Ash. My first question is why do you need such a wide foundation? You only need to support the structural frame and the bales. That can all be managed in 18″ or less. If you do need to fix the foundation from an aesthetic or structural standpoint, then providing the rods from the old to the new will work. Some important details to consider are that the rods need to be epoxied into the old concrete and should be bent to fully grab the new pour. A straight rod won’t hold well in the fresh concrete.

      Secondly, you need to make sure that the outer edge of the concrete is as flat and straight as possible so you can frame on it well. If it’s close to straight now, I would recommend leaving it as is and working with the frame to adjust the abnormalities, assuming they are within a tolerance that would allow for the necessary adjustment. Hope that helps.

  7. My husband and I are considering having our house raised so I wanted to learn more about its foundation and why it’s important. It is so true that your whole house relies on your foundation to support it, so it is really important that it’s strong no matter what kind it is. It seems to me like the foundation of your house is not something that should be overlooked. Whether it is concrete, raised, or any other kind, it is very clear to me that it’s important! Thank you for the information.

  8. I’m glad you mentioned waiting until the water has evaporated off the top of the slab before you trowel. My spouse and I are planning on building a new home this year and are really excited. Thank you for your information on the importance of foundation work!

  9. I didn’t realize that rebar in your foundation can cause issues if it is placed too close to the edge of the concrete. My husband and I want to build a second garage on our property, so we have been looking into what it would take to get started with the construction. Since the foundation is so important, it is one thing that I know I want done right. When we hire someone to help with the project, I’ll have to ask them about how they plan to place the rebar.

  10. A friend of mine is going to hire a contractor to start building their dream house. She specifically wants to make sure that she finds one who will make a strong foundation for their house because she is most anxious about having a place that is not strong enough. And I agree that having a strong foundation should be the priority because it will not be easy to fix a damage in that part of the house. Thanks!

  11. I really like how you mentioned that any problems with the foundation of your home will only get worse as time goes on. I think that’s why it’s so important to make sure the foundation and the stumps of your home are secure to begin with, so that there are no severe problems later on. My friend is noticing that many parts of her home’s exterior aren’t level, and she’s worried that she needs her foundation fixed or her home restumped, but she isn’t sure what she should do. After reading this article, I will definitely recommend that she look for a reliable house restumping service in her area to strengthen the foundation of her home and protect it from future problems.

  12. It’s great that you pointed out how ensuring that the foundation is built to the very best standards possible is very much worth it. We are planning to build a new house and obviously, we need to start with the foundations. Expertise is a must for this, so I’ll ask a foundation specialist to take care of this work.

  13. Hi Andrew,
    I appreciate your work over the years. I have benefitted from your publications.

    I am disappointed to see that you have not included alternative foundation technology. The most energy efficient home that I built and use the technology developed by the building research branch of the national research council of Canada. This technology uses a deep (2 feet minimum) layer of 2 inch washed rock in the bottom of the foundation hole. On top of this is built a level floor of PWF with a minimum 2 inch space to the walls of the dugout. Once the walls of the preserved wood foundation are built, the gap to the edge of the dugout is filled with 2 inch washed rock. With adequate provision of drainage of the dugout so the water has somewhere to go, this provides totally water free foundation.
    I would appreciate it very much. If you would include a blog about alternatives to concrete, since concrete is the most energy INEFFICIENT material in the building trade.
    Thanks for your good work, Paul

    1. Hi Paul, Thanks a lot for your valuable feedback and for sharing your experience with alternative foundation technology. I really appreciate it! I want you to know that I’m actively working on adding more diverse and energy-efficient techniques to our future blogs. The wood foundation method you mentioned sounds super interesting, and we’re actually going to be involved with something similar in our upcoming workshop in Ann Arbor, MI. I’ll make sure to document the whole process and share it in a future blog. Thanks again for your support, and keep an eye out for more updates!

  14. Why are we using concrete foundations? Why not clay and stone ? natural materials????

    1. When it comes to foundations, there’s a wide range of materials, shapes, and methods that can be used. In this article, we’re just getting started and touching on the basics. Now, while it’s true that there are alternatives to using concrete in foundations, let’s not forget that concrete still takes the spotlight in most cases. We see this article as a golden opportunity to explore foundations as a whole, with concrete as a reliable resource and the most popular material out there. Stay tuned for upcoming articles that will specifically discuss alternative foundation methods.

Leave a Reply

Your email address will not be published. Required fields are marked *

This site uses Akismet to reduce spam. Learn how your comment data is processed.

Top