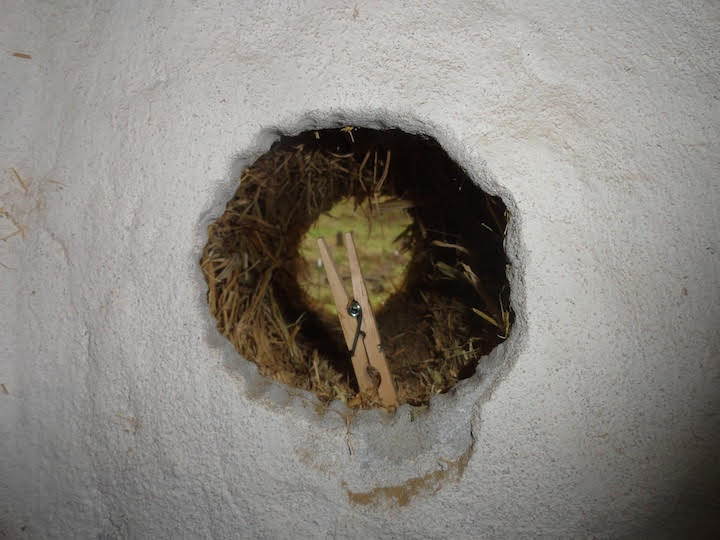
 A reader wrote in some time ago about a hole saw he created to drill through an existing straw bale wall for a vent pipe for a new hot water heater. The wall had been in place for eight years already, so the plaster was hard and fully cured. He needed the hole to be straight and clean and did not want to do a lot of plaster work to hide any new construction (or destruction). He came up with a great solution and I want to share that with you all as I think it’s something others may want to do in the future. Thanks to Dick A. for letting me share his idea/solution.
Dick didn’t come up with a name for his invention, but I like to call it the “Bale Stabber”. Okay, I literally just made that up as I was writing because I felt like it should have a cool name. If you have a better name, please let us know in the comments below. Dick used materials that are readily available at any local hardware store. He chose to buy his at Harbor Freight because, quite frankly, they have a bunch of cheap stuff and if the idea didn’t pan out, he wouldn’t be out a bunch of cash. Knowing now how well it works, I would suggest buying your materials at a store you want to support in your local community.
 So here it is, the Bale Stabber!!! As you can see from the photo, it’s a really long drill bit with a hole saw welded onto the end. It may seem simple (and in truth, it kind of is…now that he figured out the nuances), but it is a hell of an invention for the task at hand. For example, Dick learned through trial and error that the bit/hole saw did not work well in the forward direction. It seemed to chew up the straw rather than cut through it. He had a solution though, sharpen the chisel teeth to a knife point and run the drill backwards. Again, better that he did the leg work on this one than for us to all try to figure it out again on our own.
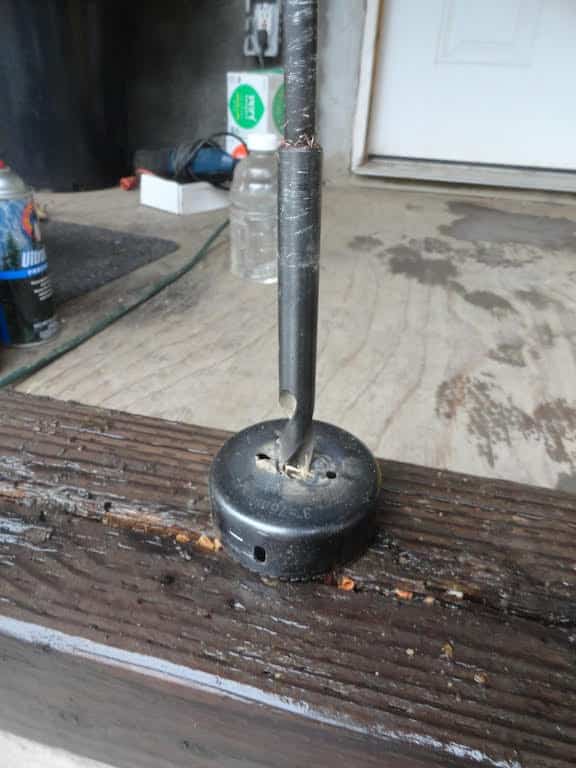 Let’s look at the process he used to create this cool tool. First he drilled the hole saw part way into a piece of wood. This helped him hold the bit steady and keep it square so that he could weld the rod in place, making sure that the whole assembly would turn properly and not wobble. This is a crucial detail as a bit that is welded off center will not cut well no matter what material it goes into. If you have a lathe that you can turn the bit on, you can check to make sure it’s perfectly centered before you start your job and, if not, you can make adjustments along the way. I had a chance to watch a guy do this for me in Mexico last year when I needed to make a similar extension for a drill bit. It was fun to watch him turn and “adjust” (read; smack with a hammer, perfectly timed, as the steel rods turned on the lathe). I thought for sure there was no way he was going to be successful; but in the end, I had an amazing, extended drill bit; and all from scrap metal in his yard for the low, low price of $2!
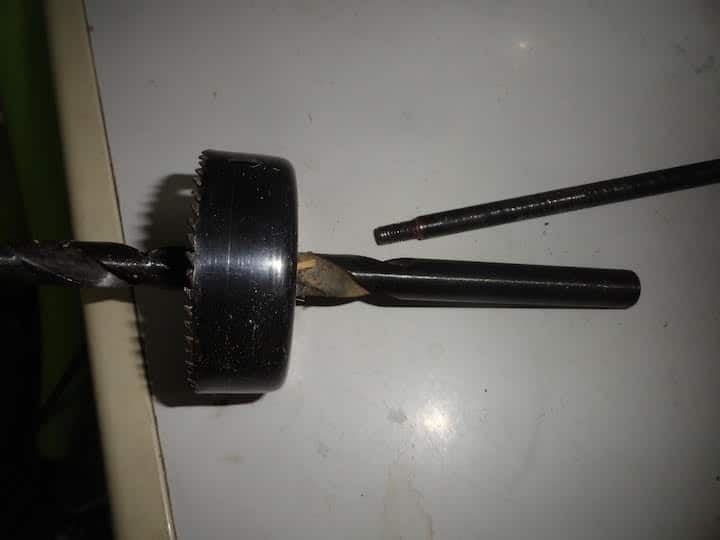 You may need to use more than one rod, depending on how thick your bale walls are and how long of rods you have access to. Be careful to check the thread direction when using multiple sections with threaded connections so the bit assembly doesn’t unwind itself inside your wall. In fact, Dick recommends spot welding the threaded sections together so that they can’t come undone. For some of the longer rods, they don’t make a solid core version so you are required to go with threaded sections.
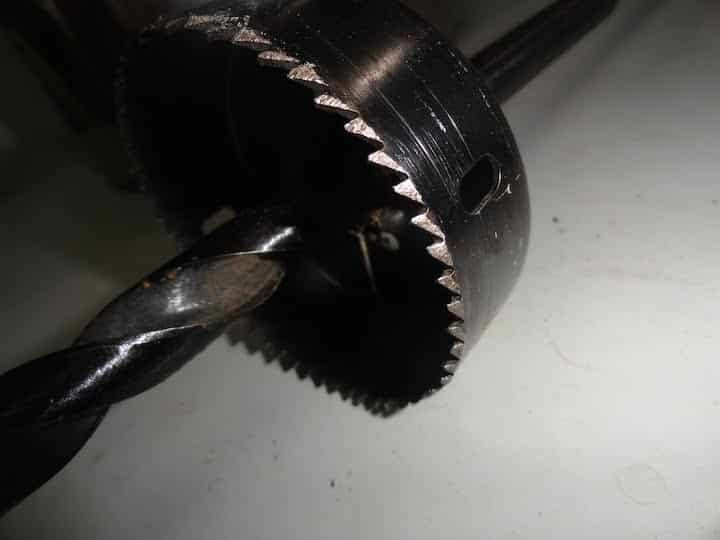 As I mentioned above, the hole saw worked better in reverse with the teeth sharpened to a knife point. The sharpening gave the teeth a double cutting surface which produced a much cleaner cut through the plaster and the straw. This was especially important in the straw as the forward cutting motion he originally tried made a huge mess as it pulled the straw and chewed it up, rather than cutting it. He used a grinder to sharpen the teeth, which takes a steady and consistent hand. If you have not done this type of work before, be sure to practice on something of lesser value before going for the whole enchilada. Further, be sure to secure the hole saw in a vise or some other contraption so that it can’t move while being sharpened. You don’t want things jumping around when running a grinder at high rpm against sharpened steel teeth!
If you have mesh behind your plaster, you need to be careful as you approach it with the drill bit. Chances are it will not be happy to encounter the mesh and it may cause the hole saw to bind up or worse yet, twist your wrists. Whenever working with a strong drill, it’s VITAL that you brace the drill against twist. It’s not uncommon to hear of people literally breaking their wrists because a “Hole Hawg” or “Right Angle Drill” bound up and kicked without being braced. These drills are amazing, and I highly recommend them; however, only if you know how to use them. The torque is so high on those drills and the speed too fast for you to be able to react in time should it kick. The drill binds, the torque keeps turning, and your wrists become the breaking point! Consider the direction of turn and brace the handle against the wall or something else that is strong enough to stop the rotation should it come to that. But I digress…when you get to the mesh, pull the drill out and use nippers to cut the mesh away before continuing with the hole saw.
Be safe, have fun and…Happy Holes Everyone!!!


19 Responses
Hi Andrew,
Thank you for the helpful post. I am preparing to drill into a 10 year old lime plastered wall for a rinnai furnace vent. The house is located in Vermont so climate is cold and wet. Are there any specific construction details you recommend? In your opinion, how vulnerable is this chase long term? I keep hesitating on this project thinking it may lead to long term problems. More expensive options exist but the rinnai direct vent furnace is the preferred option. Any thoughts?
Hi Bryan. Good timing for the article, eh? I would suggest that you use a sleeve around the pipe you need to install so that you can isolate it from the bales. Because the furnace pipe will have the potential for condensation, especially in the location you live, it would be good to keep that away from the straw. You will also need to confirm that the pipe can go through flammable materials. I believe that the Rinnai is a unit with a high efficiency, thus the exhaust pipe is likely plastic and set backs won’t be an issue. But always good to check.
Let’s say you need a 2″ exhaust line, you could drill a hole large enough to fit a 4″ pipe, place the 2″ pipe inside of that, insulate around it, and then use a copper flashing at the exterior of the wall (slid behind the plaster and over the pipe) to keep any water from getting into the building. Finish the whole thing with a high quality caulking, and you’re good to go.
Good luck and stay warm!
I have a different, but similar idea about shaping and trimming bales. I use an angle grinder with a sanding disk and backer attachment. The edge of the disk shaves off the straw better than anything else I’ve tried. The face of the disk has practically no effect whatever.
Hi Cari. Thanks for this. Sounds great for shaping bales for sure. I think I’m right in my vision of what you’re talking about in that it would not work for drilling through a wall, correct? It is more for surface shaping, etc…Just want to make sure I’m “seeing” it right.
Thanks, Andrew! This solves another problem. OldWorldGardenFarms.com has a great idea about a very simple way to plant a straw bale garden. It involved cutting large round holes in the bale with a reciprocating saw. I tried it, but it was SO hard to cut. It gummed up my saw, but I persisted. The cucumbers did great, just like they said they would, but I knew I wouldn’t do it again unless I could find an easier way to cut the holes. I’m going to try this. Dual purpose tool!
Perfect! Multi-use tools are the best. Always nice to hear from you Lynn.
at idea today as I plant and Ii am having a very easy time of it. I am using a 10″-12″ pruning blade with little problem. The straw does seem to gum up at the base of the blade, I remove the blade and clean it out. No fuss.
Thanks for sharing the tip!
Wow!! This is an excellent piece of information to put in my Straw Bale House book!! The book is for when I die, my children know all there is to know about this beautiful home, including Andrews phone number
Thank you for sharing.
I am calling it the Bale House Chomper
Linda Phelan
That’s awesome Linda. Hope you’re doing well my friend. I know it’s been a rough road as of late. Sending you love.
There are a few easier ways to mate the extension to the bit. The easiest is to find a close tolerance fit between the bit outside and the inside of a piece of common schedule 40 pipe, typically 1/8″ or 1/4″, or a coupling. Shim tight and weld. . Next would be a double set collar or mechanical couping; grind a flat on the bit to receive the setscrew, tighten and go. . The last — and cheapest — is to lay both the bit and shaft in the trough of a piece of angle iron notched to clear the weld. Shim up the joint from bottom and tack on top. When the tack cools, the two should be close to aligned. The angle is a gauge that indicates straight as the shaft is rotated. Straighten, tack, etc. until joined. . Pretty amazing this method works as the plaster sand is so much harder than the saw teeth. Guessing that hole saw won’t ride again.
Thanks for the ideas Bill. Good stuff!
Hi,
Interesting post about the hole saw, but I have a question:
I assume you will have to back up the drill every 5 cm? As it’s the depth of the saw part, right?
Good point Ivo. Yes, that makes sense to me too.
The Deep Dick Drill…also available on VHS
HAHAHAHAHAH!!!! Only you Clint…only you! 🙂 Hope you’re well my friend and the great white north is treating you well.
Yes, you are seeing it right. Think of the edge of the sanding disk as a shaver. I’ve used it for rounding corners at window insets, and even for trimming a bale to fit into a tight spot. Those shavings are great for cob mixes used for sculptural detail, too.
Awesome! Cool tip.
this is just a variation of a core drill, instead of a diamond tipped hole cutter its a standard hole saw