How to Plaster Overhead in a Straw House
Yes, You Can Plaster Overhead in a Straw House—Here’s How
There’s no question, plastered window wells look incredible in a finished straw house. The clean curves and crisp detailing can elevate a space from “DIY project” to “custom natural home.”
But if you’ve ever tried to plaster the underside of a window well, often called “the lid,” you know the challenge:
Gravity doesn’t play fair.
Don’t worry. With the right materials, techniques, and a bit of patience, even a beginner can master the art of overhead plastering. Let’s walk through the key steps.
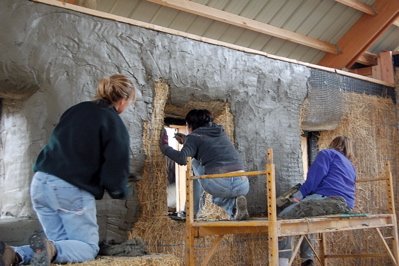
Start With Proper Backing
You’ll never get plaster to stay on a flat wooden box beam without something for it to grab onto.
Use Metal Lath (Preferably Self-Furring):
Diamond lath, also known as expanded metal or plaster lath, is ideal (you may also know it as blood lath, as its edges are razor sharp once cut!)
Make sure it’s spaced off the wood, so plaster can pass through and grip
You can use self-furring lath or layer welded wire mesh underneath the lath to create the gap
This gives the plaster something to “bite” into rather than just sitting on a slick surface
Choose the Right Sand for Your Mix
This step is often overlooked, but it matters, especially if you’re using lime or earthen plasters (which we hope you are’re).
Sand Selection Tips:
Use sand with a top grit size of 3/16”
Check that your lath allows for this grit size to pass through
If not, make sure the smaller grit still can. Penetration into the lath is key for strength.
Start Thin—Then Build
Beginners often want to slather on a full coat right away. Don’t do it. On vertical surfaces that might work, but overhead? Gravity will win every time.
The Right Technique:
Apply a very thin base coat
Press it firmly into the lath and mesh/straw
Don’t worry if some falls. This is about anchoring the first layer, not finishing
Work It Like You Mean It
Here’s the counterintuitive truth: when plaster keeps falling off, many assume they need to go gentle. In fact, you need to go harder.
Turn your trowel perpendicular to the curve
Press firmly into the lath and straw
Move back and forth with real force
Some mud will fall, but what sticks will be deeply embedded and strongly bonded to the wall.
Add Bulk (Carefully)
Once that initial thin coat is holding:
Add more plaster to build up thickness
Anchor it well to the first coat
Don’t overload it. A little goes a long way
This is where you start sculpting your shape and finishing your curve.
Alternative Option: Exposed Lintels
If the idea of overhead plaster makes you sweat, there’s a beautiful alternative: exposed lintels.
Think live-edge walnut slabs. No plaster on the lid at all. Just thick wood, beautifully finished, with plaster diving into it from above.
Absolutely stunning, and no overhead trowel work required.
Want to Learn More About Building Your Own Straw House?
Plastering is just one piece of the puzzle. Want to learn the full system—foundation to finish?
👉 Sign up for our FREE 16-Day Straw Bale Building eCourse and start your journey toward building your own straw house with confidence.
Updated: July 25, 2025