Drying a Wet Straw Bale Wall From the Inside Out

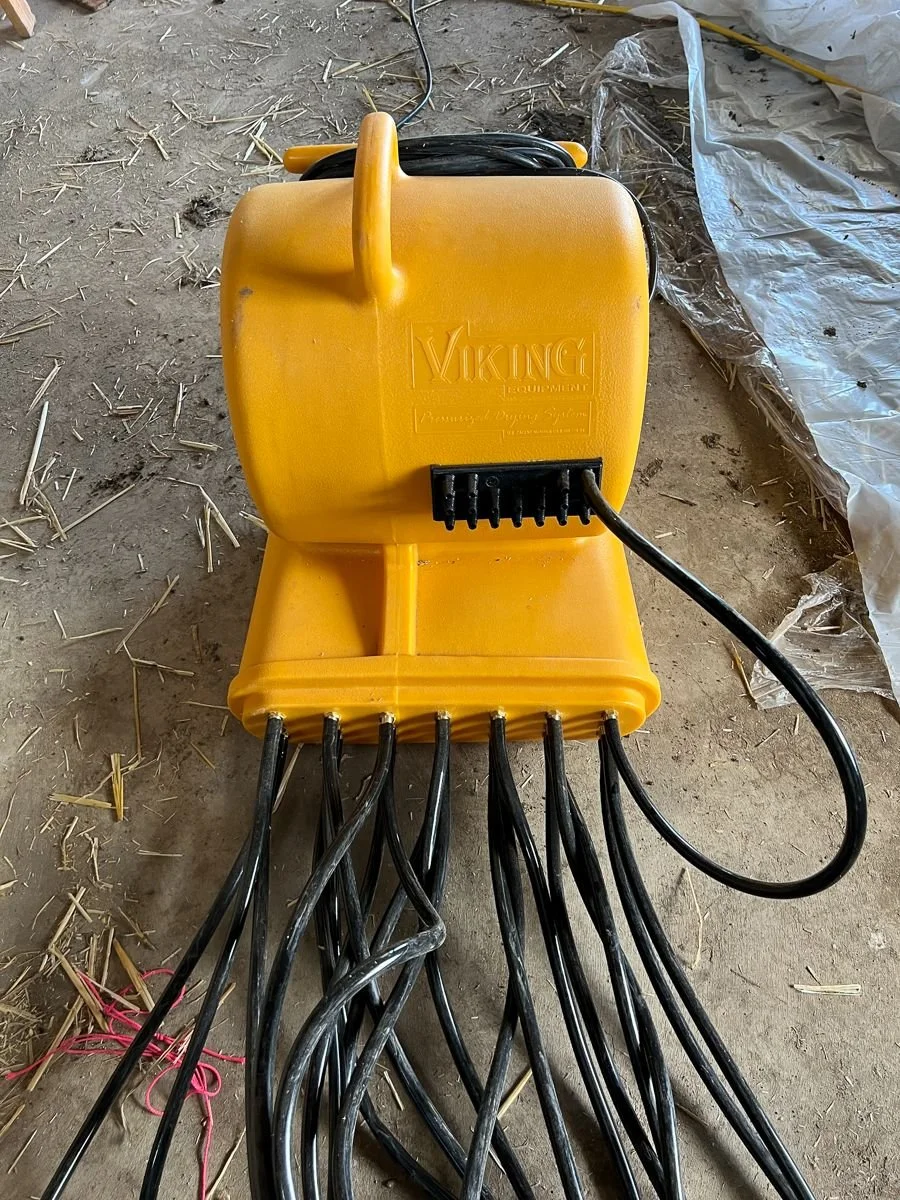
Viking PDS-21 Pressurized Wall Cavity Dryer
Every straw bale builder hopes to avoid this moment.
You’ve done the homework. You’ve read the books, attended workshops, studied details, and planned your build with care. The walls are up. The project is moving forward.
Then you check the wall and find moisture where you don’t want it.
Not a little surface moisture. Not damp plaster after a storm. Moisture readings above 20% in the middle of the bales.
If you’ve spent much time around straw bale construction, you know this is serious. A wet bale wall needs attention. It also needs a calm response.
First, Find the Source of the Moisture
The first step is not to start drying the wall.
The first step is to figure out why the wall got wet.
Is the roof protecting the wall well enough? Is rain hitting an exposed gable end? Is water collecting somewhere it shouldn’t? Is the plaster staying wet for too long? Is there a flashing or drainage issue?
Until the source of the moisture is addressed, drying the wall only buys time. The water will keep coming back.
Once the source is handled, the next question is harder.
Do you dry the wall, or do you tear into it and replace bales?
That choice depends on the condition of the straw. If the bales are breaking down, smell rotten, or show signs of decay, replacement might be the better path. But if the bales are still sound and the main problem is high moisture, drying the wall might save a lot of work.
A Drying Problem in Idaho
My friend Michael is building his straw bale home in Idaho. He is doing much of the work himself, which is impressive. It also means the project moves at the speed of one person doing a lot of jobs.
Before winter, Michael got one scratch coat of lime plaster on the house. Then, the cold weather stopped the next coat from going on.
In some climates, and with some wall exposures, one coat of plaster might get a wall through winter without much concern. This winter was different.
It was warm and wet. One exposed gable wall took a lot of direct rain. The plaster stayed wet for long stretches, and eventually the straw started taking on moisture.
Michael had been monitoring the wall, so he knew he had a problem before it was ignored too long. The readings were high enough to act. The wall either needed to dry, or sections of it might need to come apart.
That is where this tool setup became interesting.
Getting Air Into the Center of the Wall
The hard part about drying a straw bale wall is not the surface. The hard part is the center of the bale.
Airflow across the outside of the wall helps, but it does not quickly reach moisture deep inside the straw. If the moisture readings are high in the middle of the wall, drying needs to occur there.
After trying a few approaches, Michael found a tool called a pressurized wall cavity dryer. It is a blower unit designed to push warm, dry air through small hoses into wall cavities.
The unit he used had twenty-one ports for flexible hoses.
That part was useful, but it still needed a straw bale adaptation.
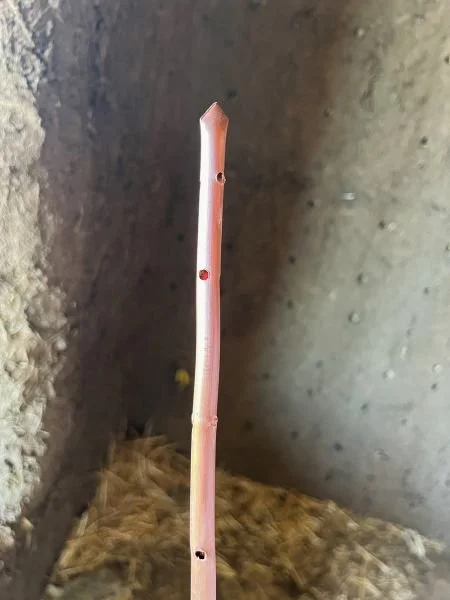
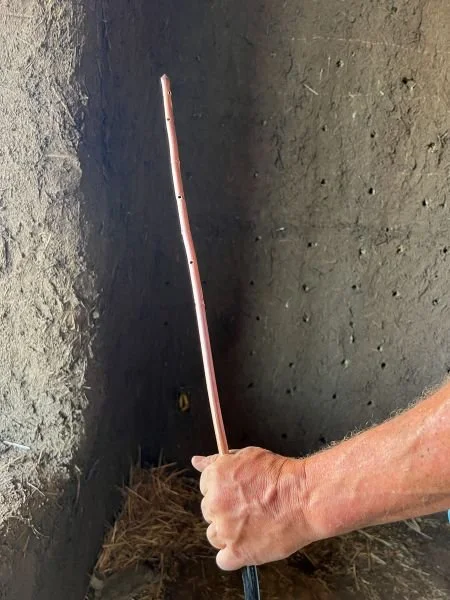
Michael fabricated 18-inch copper wands and drilled small holes in them. The hoses from the dryer connected to the wands. Instead of blowing air only at the face of the wall, the wands carried warm, dry air deep into the bales.
That is the part I found worth sharing.
The tool did not dry the wall from the outside in. It helped dry the wall from the inside out.
How the Drying Setup Worked
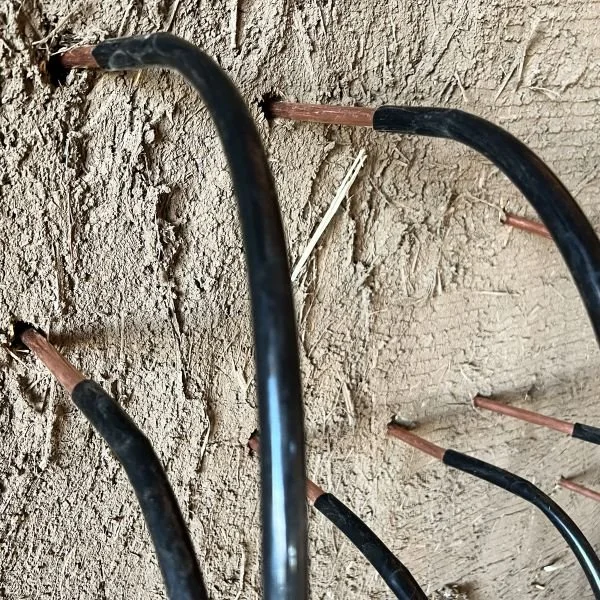
Michael laid out a grid across the wet area of the wall. He used a concrete stake to make holes in the bales, then inserted the copper wands into those holes.
The drying unit pushed warm, dry air through the hoses and into the wands. The small holes in the wands released air inside the bale wall, where the moisture readings were highest.
He worked his way across the wall, moving the wands as needed and checking moisture levels as the drying progressed.
If I remember correctly, the wall dried down in about a week.
That timeline will vary. Climate, wall exposure, plaster thickness, temperature, humidity, and starting moisture levels all matter. Still, seeing a bale wall dry from deep inside the wall, without tearing the wall apart, was encouraging.
Putting Holes in a Wall Is Not Ideal
I understand the hesitation.
Nobody wants to poke holes into a wall they already built, prepped, and plastered.
But in a situation like this, the choice is not between a perfect wall and a wall with small drying holes. The choice might be between small repairable holes and removing a section of wall.
Those holes still need to be patched. Loose straw needs to be packed back in. Mesh, lath, or plaster prep needs repair. The plaster needs to be patched with care.
That is extra work.
It is also far less work than removing and rebuilding a section of bale wall.
Why This Technique Is Worth Sharing
I am not sharing this as a proven standard detail. I have not used this tool on dozens of wet walls. I saw it used in one real situation, and it made sense.
What stood out to me was the system's logic.
If the moisture is deep in the bale, get warm, dry air deep into the bale.
For anyone who finds themselves with a wet bale wall, this might offer another option before tearing into the structure. The key is to stay honest about the condition of the straw, stop the source of the moisture, and keep taking readings until the wall is truly dry.
A wet straw bale wall is not something to ignore.
But it also does not always mean the wall is lost.
Sometimes the right tool, with a little creative adaptation, gives you a way forward.
Have you dealt with a wet straw bale wall on your project?
I’d love to hear what worked for you. Share your drying method, repair approach, or lessons learned in the comments below so others in the straw bale community can benefit from your experience.